Create a RESTful API with Apigility
On the 7th October 2013, Zend introduced Apigility to the world. Once you get past the name, you see a very interesting project that allows you to easily create a web service without having to worry about the nitty-gritty details.
Which details? Well, Apigility will handle content negotiation, error handling, versioning authentication, and documentation for you, allowing you to concentrate on your application. On 7th May 2014, Apigility was declared stable and ready for production as version 1.0 was released. In this tutorial we will create a simple REST API that allows us to view a list of music albums, showing how to start using Apigility and how to publish an API using this tool.
Getting started
Apigility is an open source project hosted on GitHub. The easiest way to get started with Apigility is to use Composer, you can get installation instructions from their site if you don't have it already.
We can use Composer to create an Apigility project. Change directory to wherever you want to put your new project, and then run this command:
$ composer.phar create-project -sdev zfcampus/zf-apigility-skeleton musicThis will install the Apigility skeleton project which we will use as the starting point for our application. During the install, you should answer 'Y' to question 'Do you want to remove the existing VCS (.git, .svn..) history? [Y,n]?' as we do not want the skeleton’s .git files.
Development mode
As part of the project, Apigility provides an administration system to allow you to create and manage the APIs that your application will offer. Obviously, you would not want the administration pages accessible on your live website and so Apigility controls this with the concept of development mode. This mode is controlled using the command line. To enable development mode, change into your project directory and type:
$ php public/index.php development enable
To disable the development mode, you can use this command:
$ php public/index.php development disable
Behind the scenes, running this command will create a new config file, config/development.config.php which enables the Apigility admin module. This file should not be stored in version control.
Apigility admin
With development mode enabled, we can access the administration tool. The easiest way to run this is to use the built in webserver in PHP versions >= 5.4:
$ php -S 0:8080 -t public/ public/index.php
We can now navigate to http://localhost:8080/apigility/ui and we are greeted by this web page:
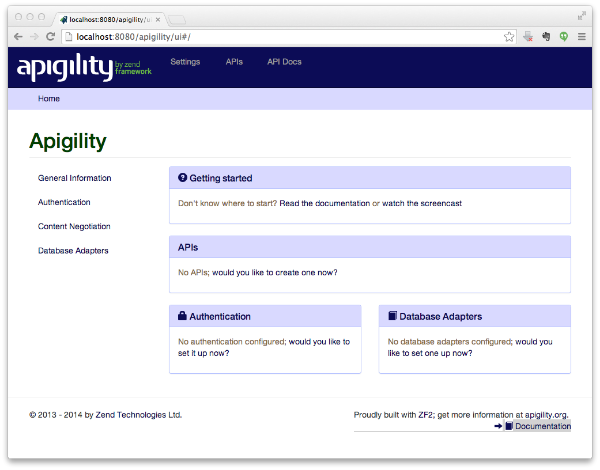
The list of APIs that are provided by the application is available by choosing APIs in the menu in the header of the page. To create a new API, we simply choose the APIs menu item and then click on the Create New API button:
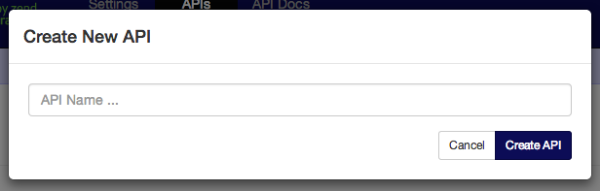
Enter an API name of 'Music' and press the blue Create API button. The Apigility admin will then create our API for us. Behind the scenes Apigility has create a new ZF2 module, called Music, within the module directory and has registered it with the ZF2 ModuleManager for us. There is no code created yet however as we haven't defined any endpoints.
We use this same admin interface to manage our new Music API:
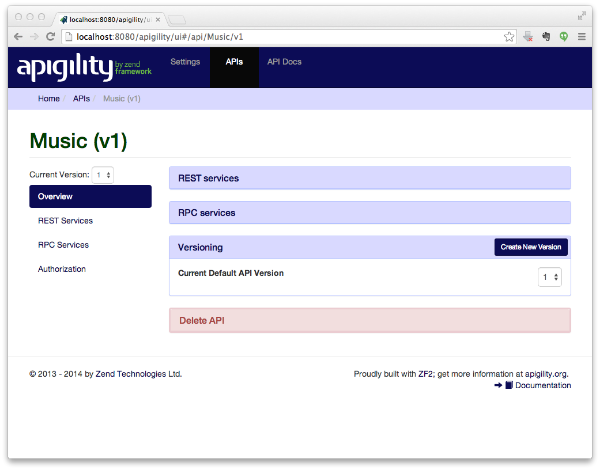
API versioning with Apigility
As you can see from the Music API's management page, the current version of this API is 1. Apigility has built in support for versioning of APIs and supports both a custom media-type (there's a good description of media types and API versioning on Peter Williams' blog) in the Accept header and a URL segment containing the version. This is, of course, completely configurable.
The tool allows you to create a new version of your API by pressing the Create New Version button. This will create an entirely separate set of PHP files within the Musicmodule so that the previous version will continue to work. As a general rule, you should create a new version whenever you introduce a change that will break all your existing clients.
Create a rest endpoint
To create a REST endpoint within our API, we click on the REST Services menu item on the left of the Music admin page. This will show the Create New REST Service button, which when pressed, opens a form providing for two different types of REST services to be created: Code-Connected or DB-Connected.
A DB-Connected REST service uses ZF2's Table Gateway component to expose a CRUD interface to a single database table with minimal work. If you use this service, you get a lot of functionality for free, but less control; you just need to write whatever field validation requirements you need.
If your requirements are more complex, then the Code-Connected REST service allows you full control, so this is the one we will use. Enter 'Album' as the REST Service Nameand press the 'Create Code-Connected REST Service' button. This will create a new REST endpoint called Album. You can click on this to manage it:
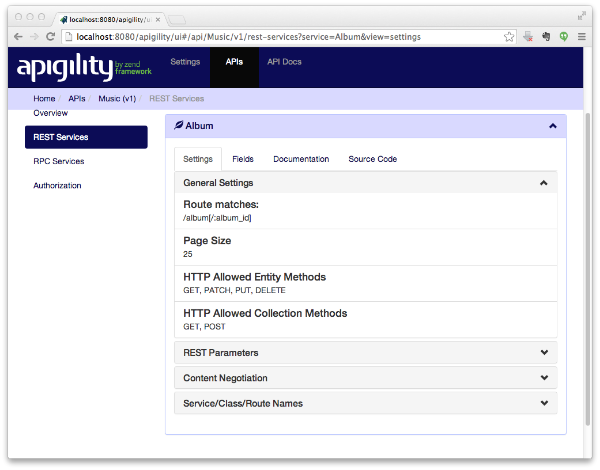
Apigility creates sensible defaults for a REST endpoint, so we don't need to change anything. The most common setting that needs to be checked is Route matches which defines the URL to reach this service. For our new service, it is /album[/:album_id] which is a standard Zend\Route definition. This will call methods from this service whenever the URL starts with /album with an optional second segment containing an id. It is important that this does not clash with any other route in the application.
Plurals and naming
I like to use a singular name for the REST service, but the URL in the route will operate on a collection, which to my mind is plural. Hence, the URL in the route should be plural. The Apligity admin defaults to the same as the service name and so it is album, so go click on the green Edit button in the 'Album' header (it only appears when you mouse over it) and change Route to match to /albums[/:album_id] and then save. This makes things a little neater.
Test the API with curl
We can test our new API with this curl command:
$ curl -s -H "Accept: application/vnd.music.v1+json" \ http://localhost:8080/albums | python -mjson.tool
The only header we need to set is Accept, in order to specify that we want version 1 of the API. As we haven't actually written any code yet, the status code returned is HTTP/1.1 405 Method Not Allowed and the body content is JSON containing some error information in api-problem error-reporting format.
{ "detail": "The GET method has not been defined for collections", "status": 405, "title": "Method Not Allowed", "type": "http://www.w3.org/Protocols/rfc2616/rfc2616-sec10.html" }
The api-problem format is a standard way to deliver error messages for HTTP APIs to help a client determine what has gone wrong. In this case, we can see that we have not defined a GET method for the availability endpoint, so let's do that now.
Create the albums collection endpoint
When we created the Music REST service, Apigility created a ZF2 module for us, which is located at module/Music. This is a standard ZF2 module with a set of directories within the module to provide structure. The configuration of the module is done using the web-based administration tool and is stored in config/module.config.php. This is helpful as you can store this within your version control system and see the changes made by the admin system.
The PHP code for our service is stored within the src directory. All the PHP classes are namespaced to the module name (in line with PSR-0 compliance) and therefore there is a subdirectory called Music immediately under src.
As we've already noticed, our API is versioned and this is reflected in the source code as a separate sub-namespace, V1. We have created a REST service also called Album, so our PHP class files for that service are stored in src/Music/V1/Rest/Album. The apigility admin tool has created four PHP classes for us in that directory:
- AlbumCollection
- AlbumEntity
- AlbumResource
- AlbumResourceFactory
These are all skeleton classes that we need to complete in order to create our API. The AlbumResource class is the entry point to the service and has a set of class method that map to the various HTTP methods that we will support:

The same class is used to operate on a collection of albums at the /albums URI and on a single album at /albums/[album_id]. As a result, for most of the HTTP methods, we have two class methods available: one for the collection and one for the item.
The AlbumEntity class is used to represent a single album. This object holds information about the album such as its name and the artist. Generally, I like my entites to be reasonably smart and so I expect them to have properties along with methods that operate on and interrogate those properties. The entity object should have no knowledge of how it is persisted however. This is the responsibility of a mapper class which we will write ourselves.
Finally, Apigility provides an AlbumCollection class for holding lists of AlbumEntity objects. This class extends Zend\Paginator, providing a helpful hint that we may need to paginate our collection data in order to be a useful web service.
Create the data model
In order for our web service to be able to read and write albums, we will need to store them somewhere. The easiest way to do that is using an SQLite database and a mapper class.
Create a database
Our application has a data directory which is ideal for storing our database and schema in. To create our SQLite database, we first create a album.sql file and then run it:
data/album.sql
CREATE TABLE album ( id INTEGER PRIMARY KEY, artist TEXT NOT NULL, title TEXT NOT NULL ); INSERT INTO album (artist, title) VALUES ('Eninem', 'The Marshall Mathers LP 2'); INSERT INTO album (artist, title) VALUES ('James Arthur', 'James Arthur'); INSERT INTO album (artist, title) VALUES ('Tinie Tempah', 'Demonstration'); INSERT INTO album (artist, title) VALUES ('Andre Rieu', 'Music of the Night'); INSERT INTO album (artist, title) VALUES ('The Overtones', 'Saturday Night at the Movies');
We use the sqlite3 command line tool to create the database with this table and data:
$ sqlite3 data/music.db < data/album.sqlWe now have a database; let's write the classes that interact with it.
Represent data with an entity
Each AlbumEntity object represents one album, so we add three properties to the class:
module/Music/src/Music/V1/Rest/Album/AlbumEntity.php:
<?php namespace Music\V1\Rest\Album; class AlbumEntity { public $id; public $artist; public $title; public function getArrayCopy() { return array( 'id' => $this->id, 'artist' => $this->artist, 'title' => $this->title, ); } public function exchangeArray(array $array) { $this->id = $array['id']; $this->artist = $array['artist']; $this->title = $array['title']; } }
By default, Apigility will use the ZF2 ArraySerializable hydrator to convert an AlbumEntity into JSON. This requires us to implement two methods getArrayCopy() and exchangeArray().
Load and save data
To load and save to the database, we use a mapper class. Apigility didn't provide any skeleton classes to help us as it does not know which persistent storage system we will use. For this tutorial, we will create a class called AlbumMapper that uses a Zend\Db database adapter:
module/Music/src/Music/V1/Rest/Album/AlbumMapper.php:
<?php namespace Music\V1\Rest\Album; use Zend\Db\Sql\Select; use Zend\Db\Adapter\AdapterInterface; use Zend\Paginator\Adapter\DbSelect; class AlbumMapper { protected $adapter; public function __construct(AdapterInterface $adapter) { $this->adapter = $adapter; } public function fetchAll() { $select = new Select('album'); $paginatorAdapter = new DbSelect($select, $this->adapter); $collection = new AlbumCollection($paginatorAdapter); return $collection; } public function fetchOne($albumId) { $sql = 'SELECT * FROM album WHERE album_id = ?'; $resultset = $this->adapter->query($sql, array($albumId)); $data = $resultset->toArray(); if (!$data) { return false; } $entity = new AlbumEntity(); $entity->exchangeArray($data[0]); return $entity; } }
The fetchAll() method uses Zend\Db's Select object to get data from the database. This enables the paginator class to alter the generate SQL so that Apigility can automatically paginate our collection. The fetchOne method simply fetches a single row and returns an AlbumEntity.
The mapper class depends on a database adapter that is passed in via the constructor. Apigility already uses ZF2's dependency injection container, Zend\ServiceManager, so we can add our configuration to it. This is done in the Module class by adding a new method getServiceConfig() to the Album's Module.php file:
module/Music/src/Music/V1/Rest/Album/Module.php:
public function getServiceConfig() { return array( 'factories' => array( 'Music\V1\Rest\Album\AlbumMapper' => function ($sm) { $adapter = $sm->get('Zend\Db\Adapter\Adapter'); return new \Music\V1\Rest\Album\AlbumMapper($adapter); }, ), ); }
The ServiceManager will now instantiate a database adapter when we ask it for an AlbumMapper. We also need to configure the database adapter to point to our SQLite database; this is done by adding the following to config/autoload/user.global.php:
config/autoload/user.global.php:
return array( 'db' => array( 'driver' => 'Pdo_Sqlite', 'database' => 'data/music.db', ), 'service_manager' => array( 'factories' => array( 'Zend\Db\Adapter\Adapter' => 'Zend\Db\Adapter\AdapterServiceFactory', ), ), );
Here, we have told the application the name of the SQLite database we want to use and that we'd like the AdapterServiceFactory to create the correct database adapter for us.
Implement the API
With our model layer in place, we can now implement our API in the AlbumResource class by fleshing out the various methods declared there.
Fetch the collection
To return a dataset to the user when they GET against /albums, we need to edit the AlbumResource class and fill in the fetchAll() method. This is quite easy as we will want to return an AlbumCollection using our AlbumMapper:
module/Music/src/Music/V1/Rest/Album/AlbumResource.php:
public function fetchAll($params = array()) { return $this->mapper->fetchAll(); }
So how does the AlbumResource know about AlbumMapper? We inject it into AlbumResource using the AlbumResourceFactory. We add a constructor to AlbumResource to accept the injected mapper like this:
module/Music/src/Music/V1/Rest/Album/AlbumResource.php:
class AlbumResource extends AbstractResourceListener { protected $mapper; public function __construct($mapper) { $this->mapper = $mapper; }
class AlbumResource extends AbstractResourceListener { protected $mapper; public function __construct($mapper) { $this->mapper = $mapper; }
We then update the AlbumResourceFactory to retreive the AlbumMapper from the service manager and pass it to the AlbumResource when we create it:module/Music/src/Music/V1/Rest/Album/AlbumResourceFactory.php:
<?php namespace Music\V1\Rest\Album; class AlbumResourceFactory { public function __invoke($services) { $mapper = $services->get('Music\V1\Rest\Album\AlbumMapper'); return new AlbumResource($mapper); } }
Fetch all albums
We can now re-run our curl command to test our API:
$ curl -s -H "Accept: application/vnd.music.v1+json" \ http://localhost:8080/albums | python -mjson.tool
We can now see our collection of albums:
{ "_embedded": { "album": [ { "album_id": "1", "artist": "Eninem", "title": "The Marshall Mathers LP 2" }, { "album_id": "2", "artist": "James Arthur", "title": "James Arthur" }, { "album_id": "3", "artist": "Tinie Tempah", "title": "Demonstration" }, { "album_id": "4", "artist": "Andre Rieu", "title": "Music of the Night" }, { "album_id": "5", "artist": "The Overtones", "title": "Saturday Night at the Movies" }, ] }, "_links": { "first": { "href": "http://localhost:8080/albums" }, "last": { "href": "http://localhost:8080/albums?page=1" }, "self": { "href": "http://localhost:8080/albums?page=1" } } "page_count": 1, "page_size": 25, "total_items": 5 }
An Apigility API’s output is in the Hypertext Application Language (HAL) format. This format formalises how to express links and embedded resources within a response and makes it easier for your clients to consume your web service.
Fetch one album
Fetching a single resource is just a case of filling in the fetch() method within the AlbumResource object, so we can add something like this:
module/Music/src/Music/V1/Rest/Album/AlbumResource.php:
public function fetch($id) { return $this->mapper->fetchOne($id); }
Apigility expects a single entity object to be returned from fetch() and it will then convert it to JSON for us. Again we can test with curl:
$ curl -s -H "Accept: application/vnd.music.v1+json" \ http://localhost:8080/albums/4 | python -mjson.tool
Which produces this response:
{ "_links": { "self": { "href": "http://localhost:8080/albums/4" } }, "album_id": "4", "artist": "Andre Rieu", "title": "Music of the Night" }
Again, this is a HAL-formatted resource with the item's data at the top level and the _links object holding all the relevant URIs related to the this resource.
Building APIS with Apigility
Implementing the remaining HTTP methods required for a complete CRUD API simply requires the fleshing out of the remaining methods in the AlbumResource class to link to the mapper as appropriate. Apigility is currently in beta and this is particularly obvious in the amount of manual configuration we had to do, but I'm confident that by the time 1.0 is released, these minor quirks will have been ironed out.
As shown in this article, it is remarkably easy to put together a robust API with Apigility that includes robust error handling along with content negotiation for versioning and HAL-formatted output. With all this provided for you, the majority of the code you have to write is concentrated on the specific implementation of your application. This is how it should be. When you're building your own projects with Apigility, I hope that you will share your experiences with a comment, and perhaps even get involved with the project itself.
Note: This article was updated on 4th July 2014 to reflect changes to Apigility between version 0.7 and 1.0 stable.