How to get started with Google AMP on Drupal 7 and Drupal 8
Ever noticed an ‘AMP’ tag beneath a piece of content you discovered through mobile search? That’s because Google AMP – or Accelerated Mobile Pages – is now a widespread tool for brands looking to boost their SEO and deliver clean and instant-loading content on mobile.
My colleague Eddi Chen has written a really helpful introduction to Google AMP that highlights the key benefits of using AMP. Here I’ll take a look at how you can get started with the Google AMP module on your Drupal 7 or 8 website – using our very own Inviqa website as an example.
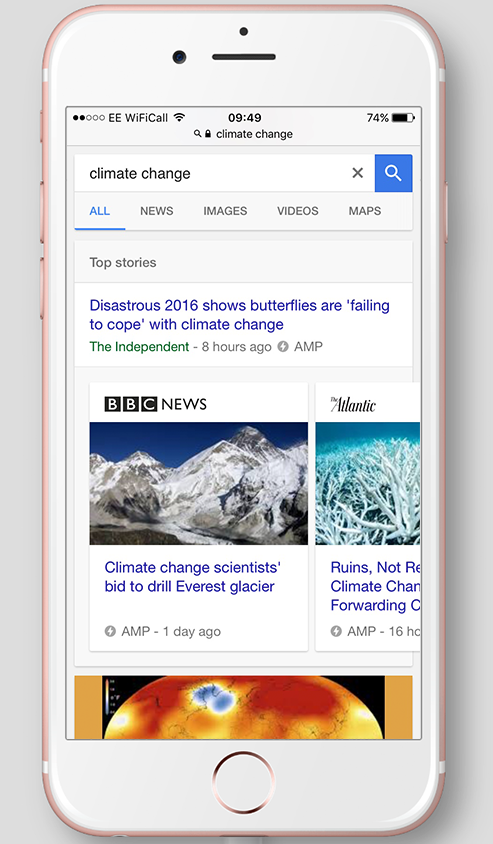
Google AMP pages are widespread
Implementing Google AMP on a Drupal website is a fairly straightforward process. There’s a great module for both Drupal 7 and 8 to ensure this is the case. Since there’s not a huge difference in the AMP implementation process on Drupal 7 and 8, this tutorial is suitable for both versions of the platform.
Installing the Google AMP module
You can start working with Accelerated Mobile Pages using the AMP module. If you’re already familiar with how Drupal works, you’ll see that the name is quite self-explanatory (modules are like plugins that enable a specific type of behaviour on your webpage).
Installing the module requires Composer which enables packaging for PHP and enables you to install dependencies. The best way to do this in Drupal 7 is to use a module called Composer Manager.
Note: Drupal 8 uses a PHP autoloader, so you won’t need to use Composer Manager. Please skip the Composer Manager steps in this tutorial if you’re using Drupal 8.
Downloading modules and themes
In your terminal, within the Drupal directory, type in these commands to download the Google AMP modules and themes.
Firstly:
drush dl amp, amptheme, composer_manager
This will download the AMP module, the AMP theme, and the Composer Manager tool I mentioned. After downloading the modules, you can enable the AMP theme, its sub-theme and Composer Manager. Note that you’ll need to enable Composer before you enable the AMP module itself since the AMP module requires that Composer Manager is up and running.
Then:
drush en composer_manager, amptheme, ampsubtheme_example
Straight after this you can enable the AMP module by typing in the following command:
drush en amp
This setup was simple and non-problematic when working on Inviqa’s website, and quickly enabled the AMP module, Composer Manager, and both the AMP theme and its sub-theme.
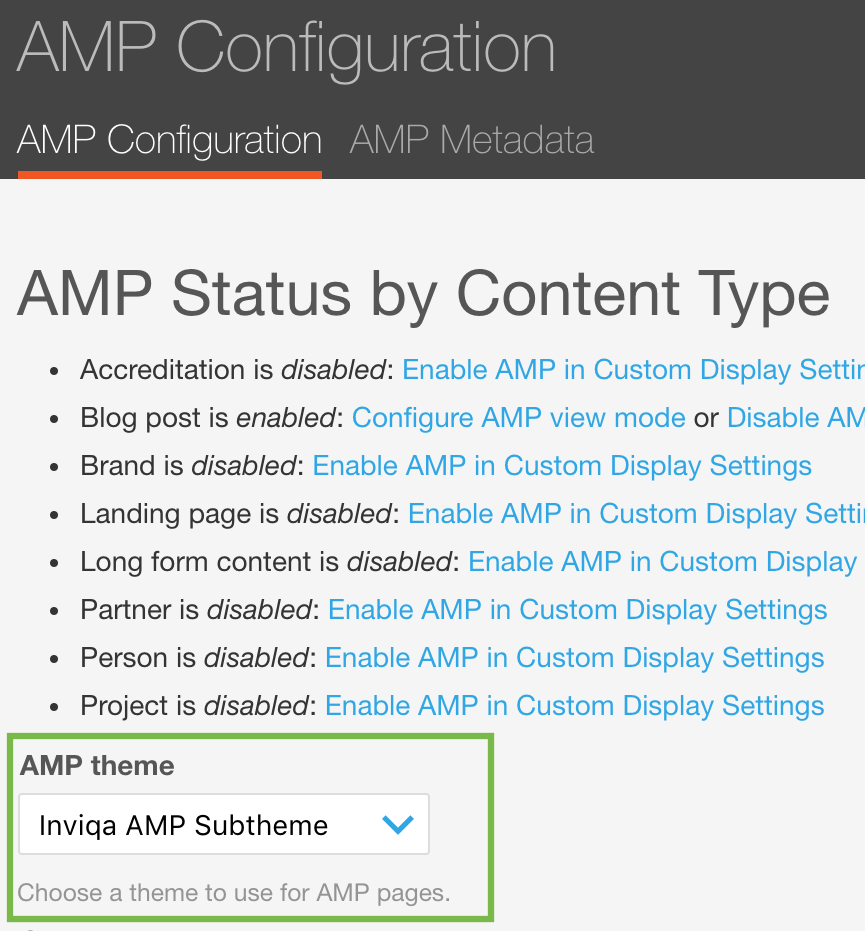
Before you can start to fully customise the look of your page you’ll first need to configure Drupal to use the AMP module. Visit /admin/config/content/amp and you will see all the defined content types on your website.
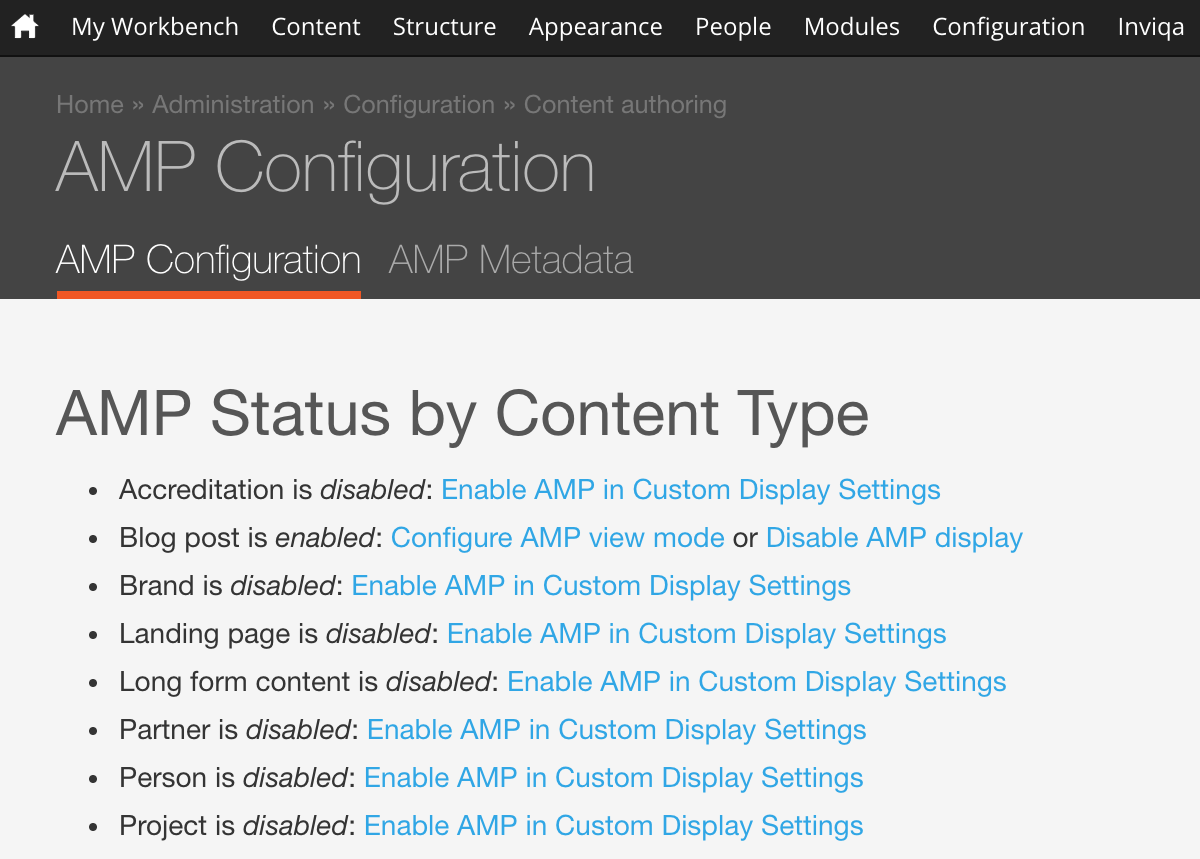
This is where you can AMP-enable your content type
It’s crucial to consider which content types you want to AMP-enable, but blog posts and articles lend themselves best to AMP. Text-content-driven pages will benefit from this the most as they will serve the information fast – without compromising look or behaviours, with a strong SEO benefit.
After you’ve decided on the type of the AMP posts you’ll generate, click the ‘Enable AMP in Custom Display Settings’ link which will open a fieldset. Tick the box for AMP and save. This will point you to a new link – ‘Configuring AMP view module’ – where you can select which fields your page will display.
This is where it’s a good idea to change all the field formatters to AMP formatters – for example, AMP Image, Iframe, and text. The gear icon will enable you to perform some extra changes.
The changes you’ve just made are the crucial part of the module as they will form the AMP components on the page. Any markup that is not valid for the AMP page, and can’t be translated, will be taken out of the view to ensure it validates.
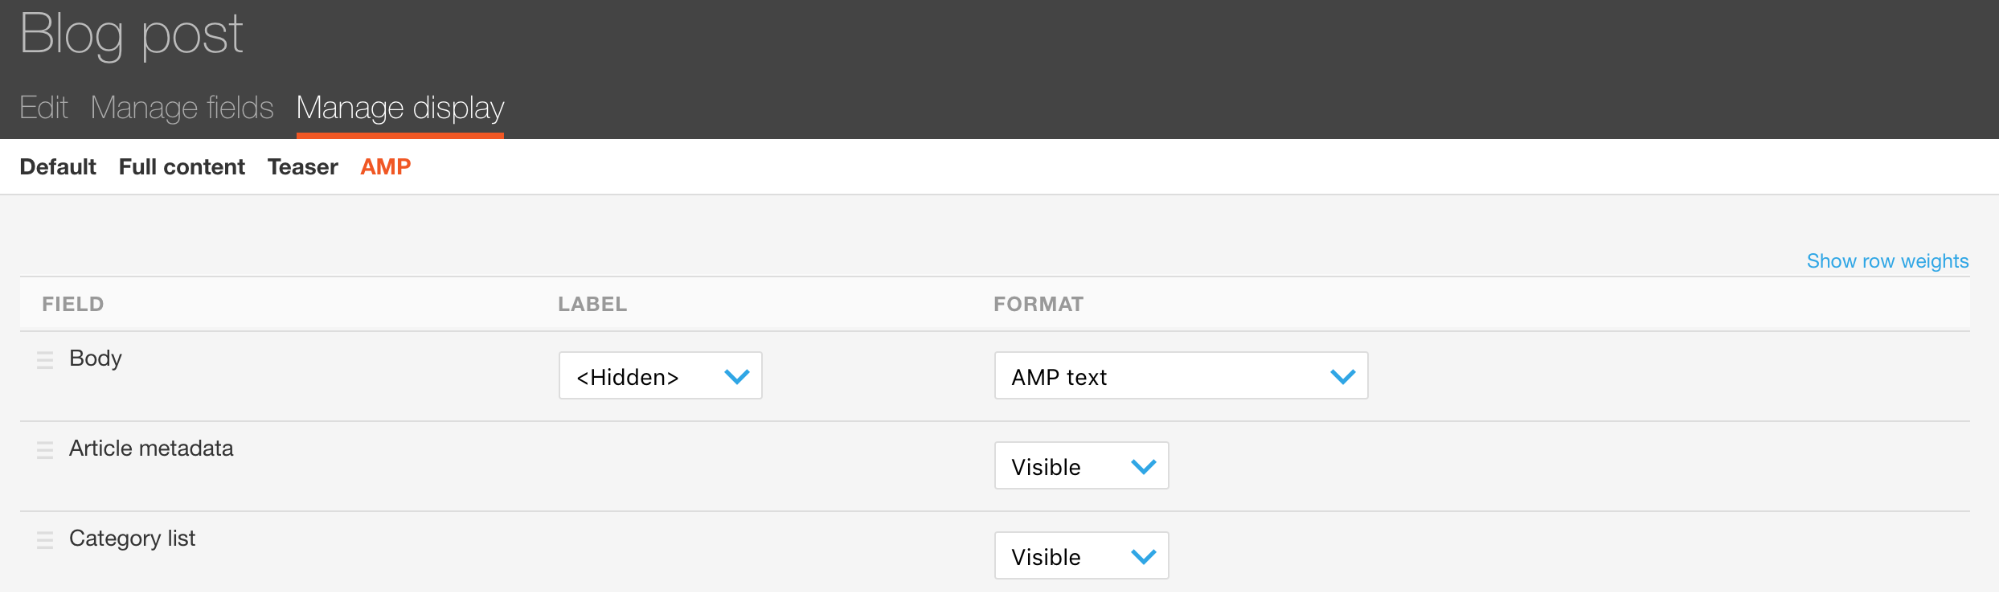
Changing your field format to AMP
Creating a theme
You might remember enabling an exAMPle sub-theme when you were enabling different types of modules. This sub-theme is a great guide for creating a theme for this AMP module.
You can enable this theme, or a custom one, by going to in/admin/config/content/amp. The base theme is the one that enables all the necessary markup which is based on the core’s Stable theme to keep things clean.
The subtheme is there for you to develop the styles and create a custom look for the page. Make sure that your CSS is below 50k as this is the limit! This can either be done in amp-custom-styles.css (Drupal 7) or in amp-custom-styles.html.twig(Drupal 8).
Enabling your subtheme
Creating a custom template from the given sub-theme is fairly simple as Google AMP does not accept custom JS and all the content has to be written in CSS. If you’re looking into writing styling using Sass, I would strongly discourage you, as controlling the size of the CSS will become much harder. It is worth keeping in mind that you can use Sass or Less as long as it compiles to the right format and file.
When developing a theme for the Inviqa blog we encountered an issue with responsive imaging. The module itself will convert any image on the page to an AMP image. The issue with this is that if you want your images to be responsive (AMP has its own layout properties), it needs to be applied to the image in the HTML tags, rather than in the CSS. As this is done using a hook in the module, the function itself has to be overwritten.
This is the overriding function that checks for images and assigns all of the attributes of the image to the new amp-image tag with a layout=”responsive” attribute that allows all the AMP images to be responsive. This function has been placed in the template.php of our sub-theme. You can find the original function in the main amp-theme in the template.php file.
function subtheme_image(&$variables) {

  if (isset($variables['attributes']['typeof'])) {
    unset($variables['attributes']['typeof']);
  }

  $attributes = $variables['attributes'];
  $attributes['src'] = file_create_url($variables['path']);

  foreach (array('width', 'height', 'alt', 'title') as $key) {

    if (isset($variables[$key])) {
      if (empty($attributes[$key])) {
        $attributes[$key] = $variables[$key];
      }
    }
  }
  return '<amp-img layout="responsive"' . drupal_attributes($attributes) . '></amp-img>';
}
Ta-da!
You have now successfully created an AMP page! To view your changes, add ?amp to the end of your url and that will show you your result.
There are several great tools to help you test your pages and ensure they’re AMP-valid, including:
- AMP Test: This is a handy tool for checking online pages. The errors shown are very accurate and descriptive, thus it enables a very efficient debugging.
- AMP Validator: If you are working locally, this is another tool that checks your markup. Make sure that you copy the static version of your source and this will check all your bugs as well.
Happy AMP-ing!