How to use the Magento 2 A/B testing tool
One of the best-kept secrets of Magento 2 (now known as Magento Commerce/Magento Open Source) is that it's the first version of Magento that offers ‘out of the box' ability to do A/B testing – no need for plugins, or custom development. If you're using Magento 2 Enterprise edition, it's ready for you. There's scarcely a mention of this in the official user guide, so here’s our tutorial for A/B testing with Magento 2.
In brief, here’s why Magento 2’s A/B testing is amazing:
- It’s built into Magento, so you don't need to add anything to use it.
- You can test up to 10 variants of a page to see which ones your customers like the best.
- You can test against any metric that you can track in Google Analytics, including bounce rate, add to cart rate, page views, and more.
- It’s designed to test on any product, category, or CMS pages.
- It offers familiar tools, no new technology to learn.
- It doesn’t cause that 'flicker' effect that you get with some A/B testing tools when they load another variant. It just works.
The background
What is A/B testing?
A/B testing is the practice of sending proportions of your audience to two versions of a webpage in order to compare the difference in engagement or performance.
Multi-variate testing (usually called MVT) is similar but doesn’t restrict you to two variants. It’s possible to test several versions of the site potentially even up to 10 versions of a webpage to find the best performing version.
The new Magento 2 (now known as Magento Commerce/Magento Open Source) testing default module supports both A/B Testing as well as MVT out of the box.
Why should you A/B test?
That's the million dollar question...literally. It could make you a million dollars, a million pounds, or maybe even an extra thousand pounds if you are smaller. There's been a lot of research to confirm that companies that perform proper A/B testing as part of their process are more likely to grow revenue.
It's clear to see why:
- The more tests we do, the more we learn what works and doesn't work for our customers.
- We get better at quickly spotting the things that work and things that don’t.
- It helps us build a culture of learning and improvement.
- Ideas for improvements can come from anywhere and most importantly can be tested with customers before they are released.
Powered by Google's content experiments
The secret sauce behind Magneto 2’s A/B testing feature is Google’s Content Experiments engine. It uses the Multi-Arm Bandit Method of testing, which allows you to test up to 10 versions of a page quickly and efficiently.
I won’t go into too much detail about the engine behind it. Suffice to say that it handles all the complex elements behind the testing data including which customer sees what version, and how many people the engine needs to confirm a new version of the page is better than the original.
Let's begin A/B testing with Magento 2
What you need to prepare:
- An idea of what content you want to test.
- An idea of what result you want to see from it e.g. reduced bounce rate.
- Ensure Google Analytics / Google Tag Manager is active on your Magento site.
- Magento 2 Enterprise edition.
Our test
Step 1: Plan your changes
Here’s a scenario for us to play with. I have noticed that our customer service page on my fake site isn’t performing well enough. I want my customers to experience a better customer service page so I want to use A/B testing to reduce the bounce rate of the page.
For my alternative page, I am going to add in a quote from a fictional celebrity YouTube blogger, Jennifer Twizzle, and see if that reduces the bounce rate.
Step 2: Create your variants for the page

List of content pages:
- Navigate to the CMS page editor under Content > Pages. Select my customer service page, and click Edit.
- Under page information, select the currently published revision and select the Content tab.
- Copy the following settings from this CMS page:
- Content
- Headings
- URL key
- Selected store
- Click Content > Pages to return to the CMS pages list.
- Click Add new page to create a new variant of the customer services page and enter in the settings copied from the original customer-service page.
- Create a new unique URL key for the duplicate page by adding a number 1 to the end of the original’s URL key. The new URL key for the duplicate page will be 'customer-service1'.
- Then make the necessary changes to the new page to differentiate it from the original design. I am going to change the CMS page to add the quote from Jennifer Twizzle.
- Click save.
You can repeat steps 1-8 as necessary all the way up to 10 variants for each page you want to test.
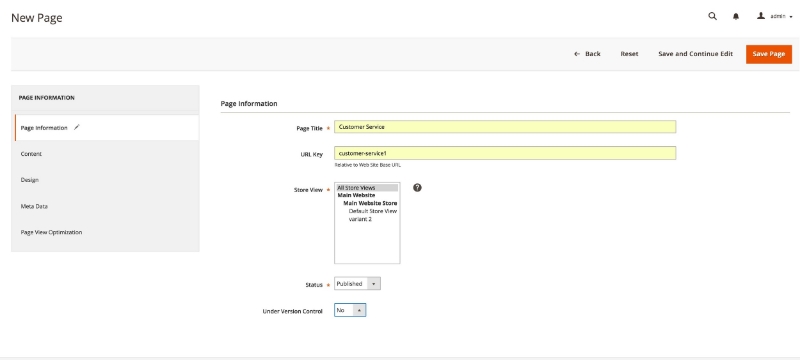
Creating Variant 1 with Url key customer-service1
Step 3: Configure Google Analytics Content Experiments for your test
- Log in to your standard Google Analytics account here.
- Select your live site account and go to Behaviour > Experiments.
- You are now presented with the Experiments Overview.
- Click New Experiment.
Step 4: Create your experiment
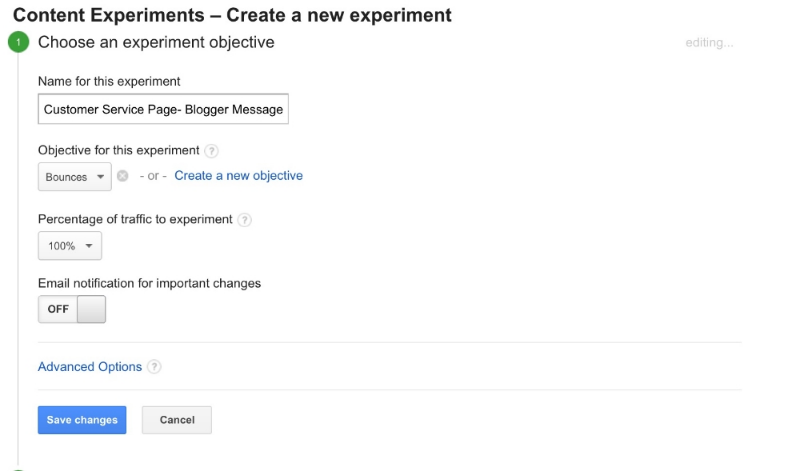
Creating a new experiment in Google Analytics:
- Enter the name of your experiment. Try to be as descriptive as you can, and keep to a standard format.
- Select the objective for the test. For our example test, we are going to see if we can improve the bounce rate for our customer service page.
- Select the percentage of traffic you are going to send to the different variants.
- You can turn on email notification for important changes, again if you are concerned with reducing the risk.
Tip: If your change is small and you want quick answers, then send a high percentage of traffic. If your company is new to A/B testing ,or if it’s a risky change, then reduce the percentage.
Setting up the test
Configuring an experiment in Google Analytics:
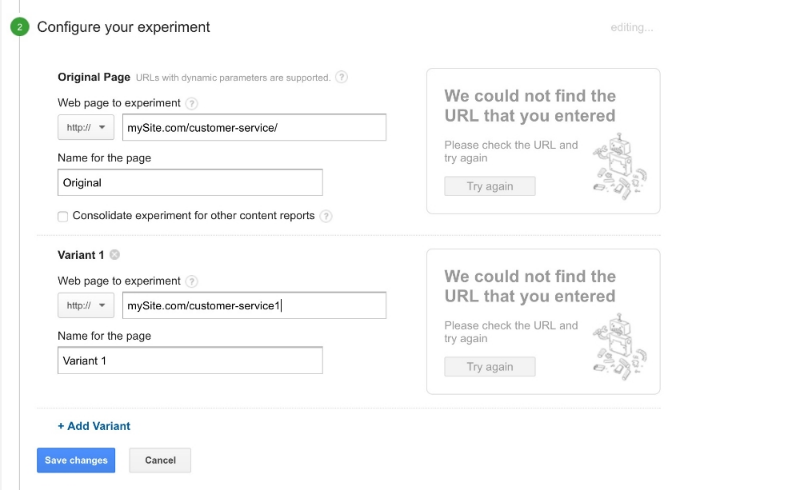
- Enter in the full URL for your experiment.
- Enter a name for the page.
- Enter your URL for Variant 1 of your test page (by adding a number 1 to the file name) e.g. mysite.com/customer-service1.
- Click Add Variant for each extra version you want to add and put the number of the variant on the file name eg: mysite.com/customer-service.
- Click Next Step to get your code.
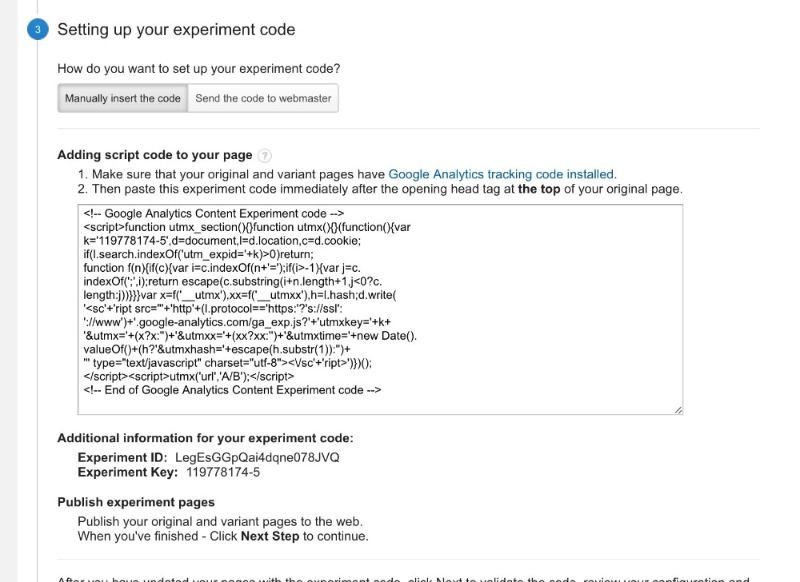
- Click Manually insert the code.
- Select and copy to get your Google Experiment code.
Adding your code to Magento
- Once you have your code: you need to firstly enable Content Experiments by going to Configuration-> Sales -> Google API and changing the Enable content experimentsoption to ‘Yes’.
- Magento will ask you refresh your caches which, once you are done, you are ready to start preparing your test.
- Go back to the page you want to test by going to Content -> Pages. Do this for your original page only, not the variants.
- Select the Page optimisation tab and paste in your Google Experiments Snippet click Save.
- If you are looking to optimise other page types, this is where you enter your Google Experiments Snippet on product, category, and CMS pages.
Start testing
Go back to Google Analytics Content Experiments and click Start Experiment.
How do I test that it's working?
Use Google Chrome’s incognito or Firefox’s private browsing mode to look at the page you are testing. This will make Magento think you are a new user and give you a different version of the page.
If you look at the URL, you will also be able to see that Google Content Experiments has added some extra details to weburl. The 'utm_expid' shows that Google has successfully included this page as part of its testing.
Wait for the results
By doing A/B testing, you have done more than most companies do, to understand your users. Hopefully, you will have discovered something new to improve your pages’ performance.
For bonus points
Share your results with your team. If it worked great or not, you have learned more about your customer and can improve your next test.
Add a new metric to the dashboards and reports that you send to your CEO or board every month. Perhaps the number of tests completed or how many improvements will be made based on the results of your test.