PHP integration with Microsoft Dynamics NAV
Here at Inviqa we're seeing growing demand for integrations with Microsoft Dynamics NAV as the ERP system for several of our clients. Here we explore how to build an Microsoft Dynamics NAV cloud instance using Microsoft Azure, look at the SOAP API structure, and show you how to access it from the PHP SoapClient.
So what exactly is Dynamics NAV? Wikipedia gives this definition:
Microsoft Dynamics NAV is quick-to-implement, easy-to-use enterprise resource planning (ERP) software that helps more than 100,000 companies worldwide manage their accounting and finances, supply chain, and operations.
Put more simply, Microsoft Dynamics NAV is a system that holds customer information, product and inventory information, and sales order information (among other things).
Integrating with Dynamics NAV from outside the Microsoft ecosystem can be done using a SOAP API, which provides access to customer, product, and order information using a consistent set of CRUD operations.
Authentication
Authentication can at first seem daunting as there are a few options available. If Dynamics NAV is configured to defer authentication to the Windows domain then Kerberos as preferred, but NTLM is also supported.
The few articles that cover integration using PHP discuss how to adapt the PHP SoapClient to support NTLM by adding a CURL wrapper. However, this technique is quite difficult to get right and can be buggy, as testified by the large number of Stack Overflow questions on the subject.
Thankfully, there's a simpler option which can be achieved by configuring Dynamics NAV to use a user / password combination, which uses Basic Authentication that the PHP SoapClient supports natively. And, as long as this is configured in conjunction with a valid SSL certificate, the security level is acceptable.
Creating Dynamics NAV in the cloud
Creating an Azure account
If you already have access to a Microsoft infrastructure then you may already have an instance of Dynamics NAV to test against. However, if your background is in open-source technologies, Microsoft Azure presents perhaps the best way to create an instance.
The only caveat to Azure is that you will need to enter your card details in order to create an account, however you will get £125 credit and can cancel at any time, so you don’t actually need to pay anything if you keep an eye on the credit level.
The £125 credit is more than sufficient to allow you to build a few cloud VMs to test your PHP scripts against. Make sure to use the free account option when signing up.
Creating a Dynamics NAV virtual machine
Once you have access to the Azure portal, the following steps need to be taken to build a VM.
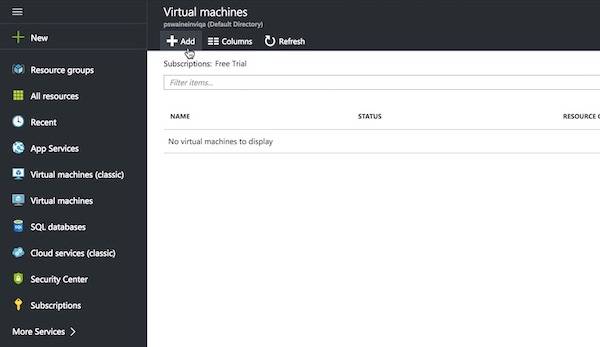
| Figure 1.1 Click 'Virtual Machines' from the left hand menu, then click the 'Add' tab. |
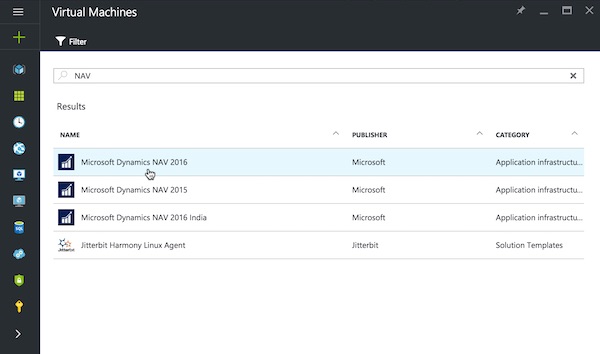
| Figure 1.2 Next, enter 'NAV' into the filter input and press return. This should display a list of Dynamics NAV VMs to choose from. Select the latest version – in this case 'Microsoft Dynamics NAV 2016'. On the next screen click the 'Create' button. |
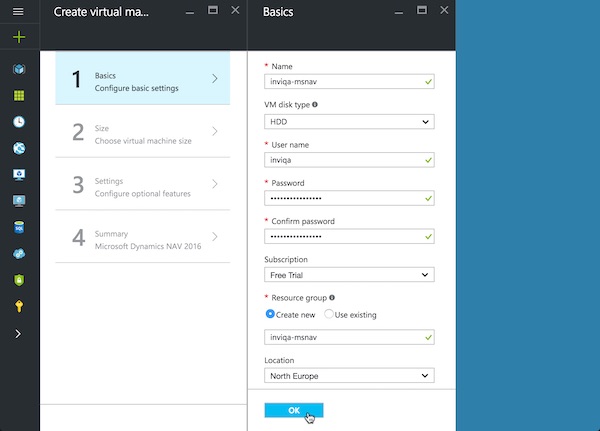
| Figure 1.3 Next, fill in the basic settings screen. The user name and password will become the Windows user profile when the VM is built. Click 'OK' to proceed. |
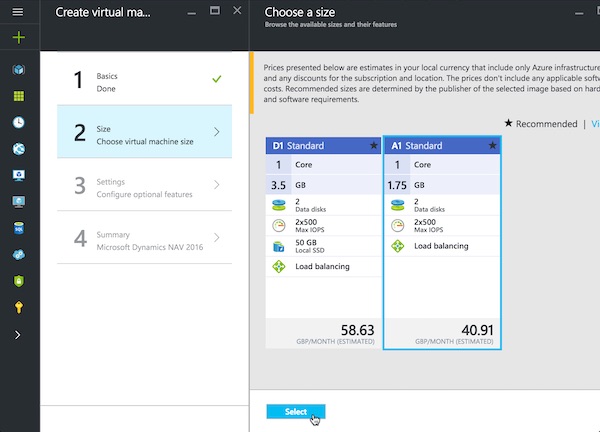
| Figure 1.4 Next, select a VM size configuration. The A1 standard is sufficient for light testing. Click the 'Select' button to proceed. |
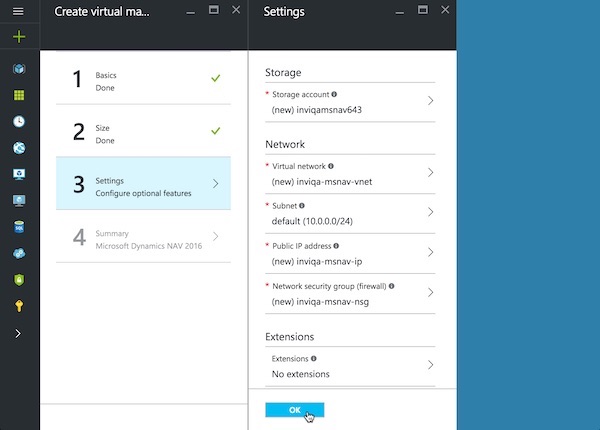
| Figure 1.5 Next, accept the defaults on the optional settings screen and click 'OK' to proceed. |
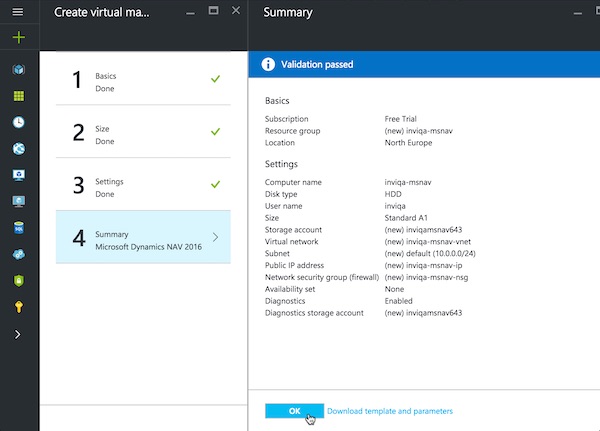
| Figure 1.6 Finally, review the summary screen and click 'OK' to begin building the VM. |
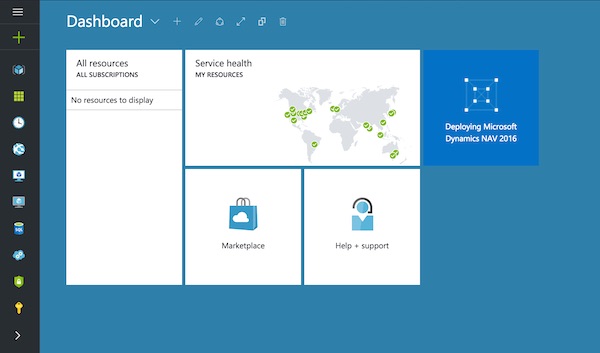
| Figure 1.7 If you return to the dashboard you will see a blue tile indicating that the VM is being built and deployed. This process can take 20 minutes or longer. |
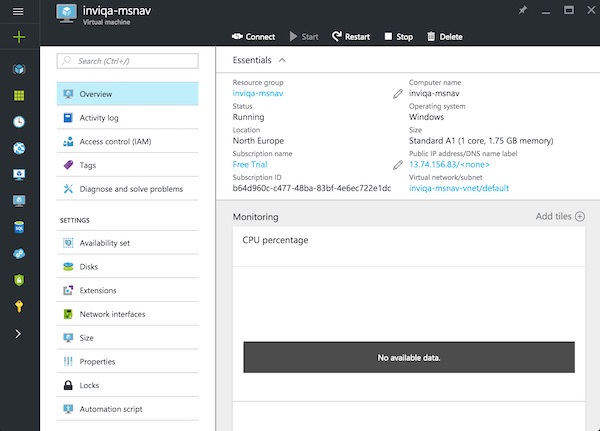
| Figure 1.8 When the VM is has finished deploying, it should automatically open the VM overview section. |
Configuring the virtual machine
There are a couple of further configuration changes that are needed in order to make the VM accessible to the internet.
Add a DNS name
The first configuration change is to add an entry to the Azure DNS servers.
Figure 2.1
Click 'All resources' from the left hand menu, which will display a list of all the components created when the VM was built. Click on the resource with type 'Public IP address'.
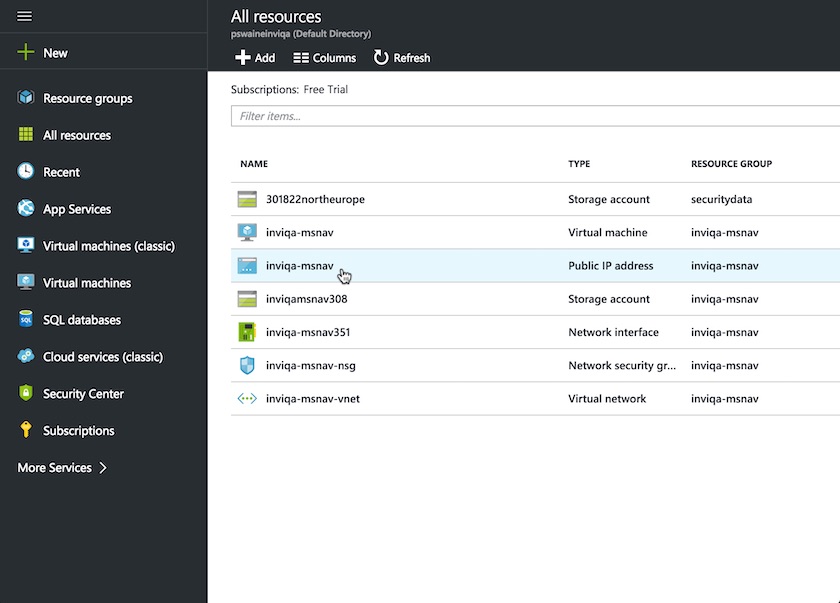
Figure 2.2
On the next screen select 'Configuration'. Then enter a value in the 'DNS name label' field and click 'Save'. This will create an A record on the Azure DNS servers.
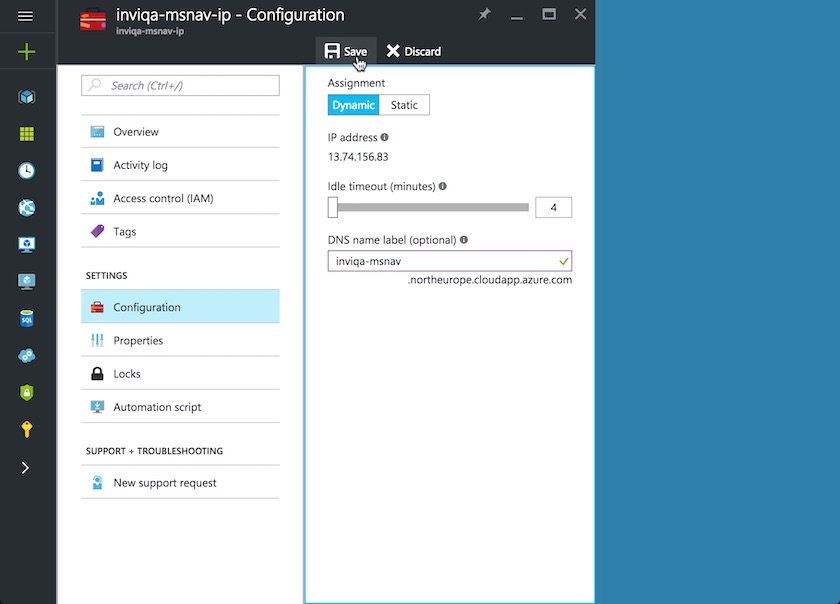
Figure 2.3
Now click on 'Overview' and the DNS name should be visible. Here it is set to [inviqa-msnav.northeurope.cloudapp.azure.com]. This value is important and will be needed later.
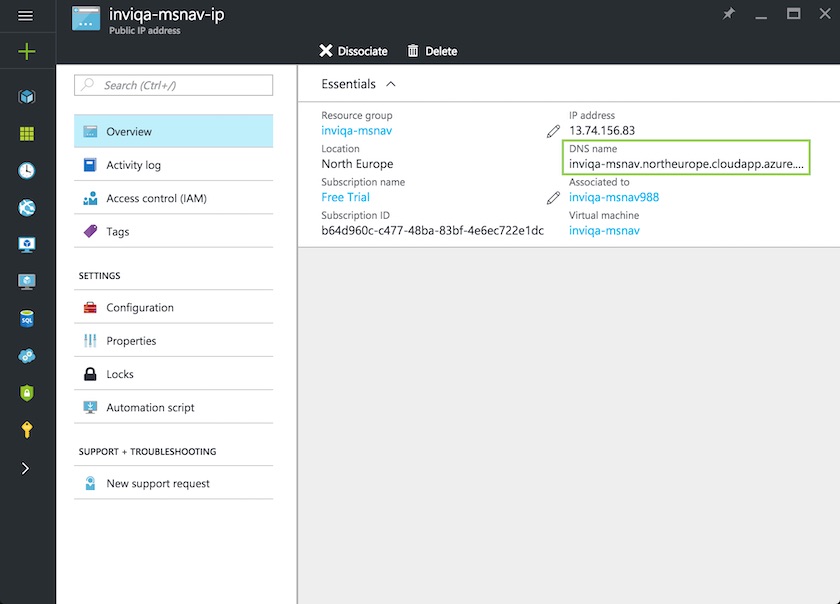
Add firewall rules
The second configuration change is to open up the ports that are needed to connect.
Figure 3.1
Click 'All resources' from the left hand menu, which will display the list of components again. Click on the resource with type 'Network security group'.
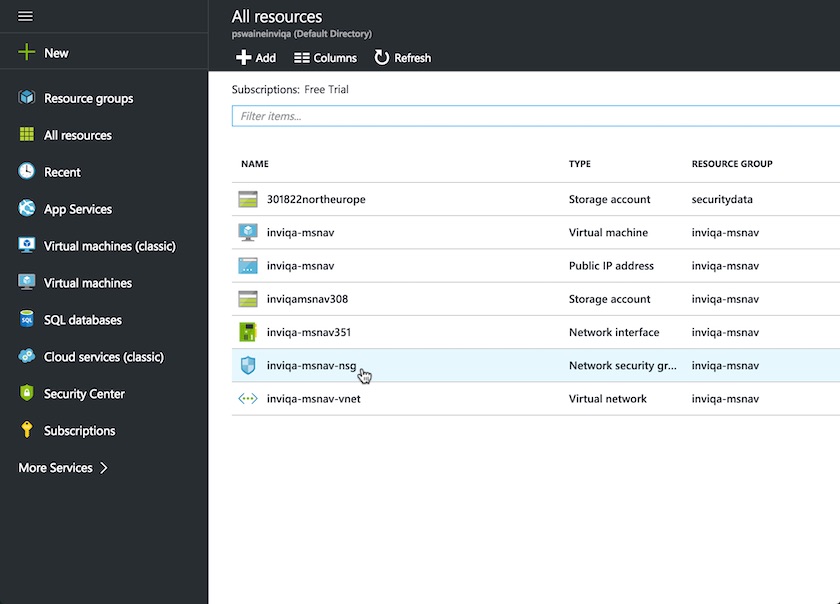
Figure 3.2
On the next screen select 'Inbound security rules'. By default there is just one rule set up, which is to allow remote desktop access (more on remote access below). Click on the 'Add' tab to add a new rule.
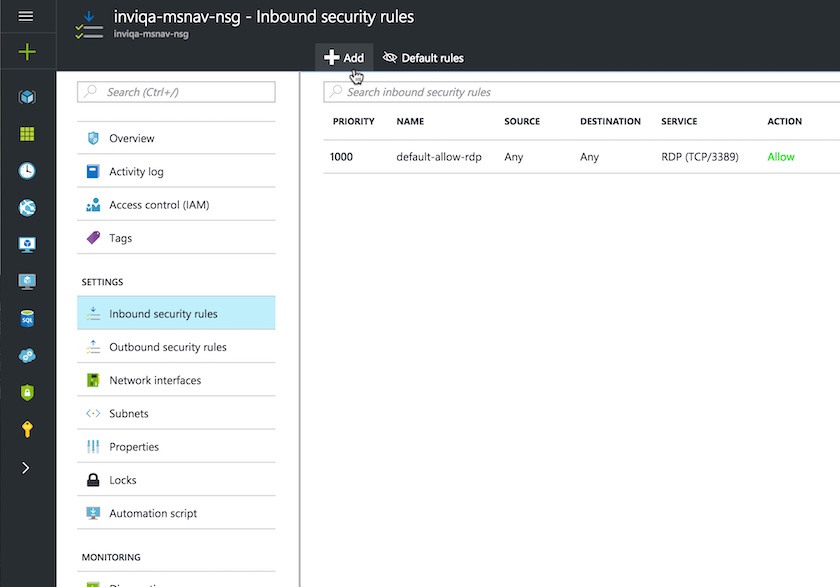
Figure 3.3
Fill in the form fields to configure HTTP traffic on TCP port 80, then click 'OK'.
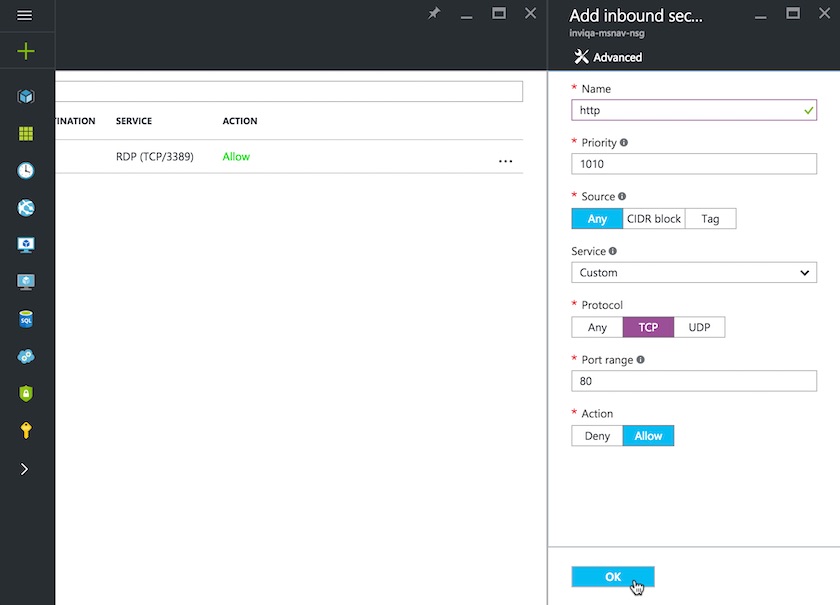
Figure 3.4
Returning to the 'Inbound security rules' screen, the new rule should appear after a few moments. The following additional rules then need adding in the same way:
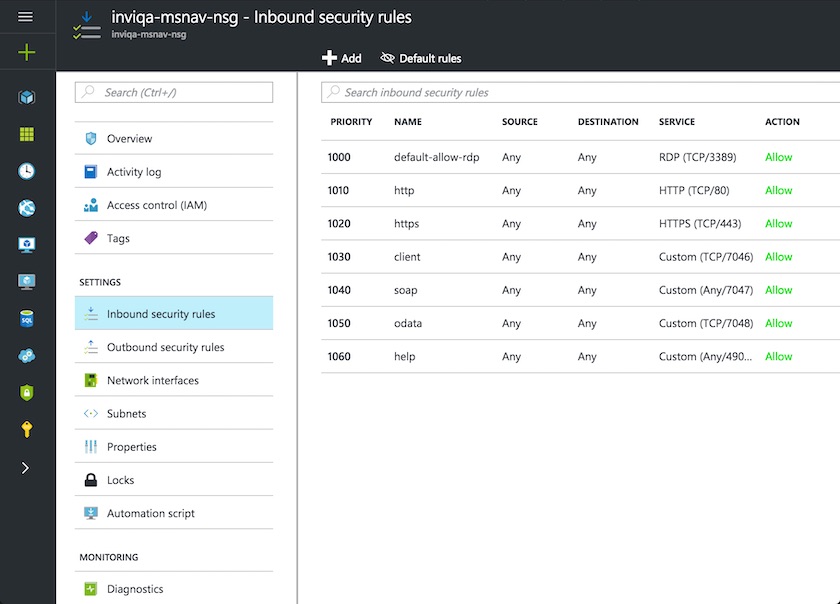
https, TCP 443; client, TCP 7046; soap, TCP 7047; odata, TCP 7048; help, TCP 49000
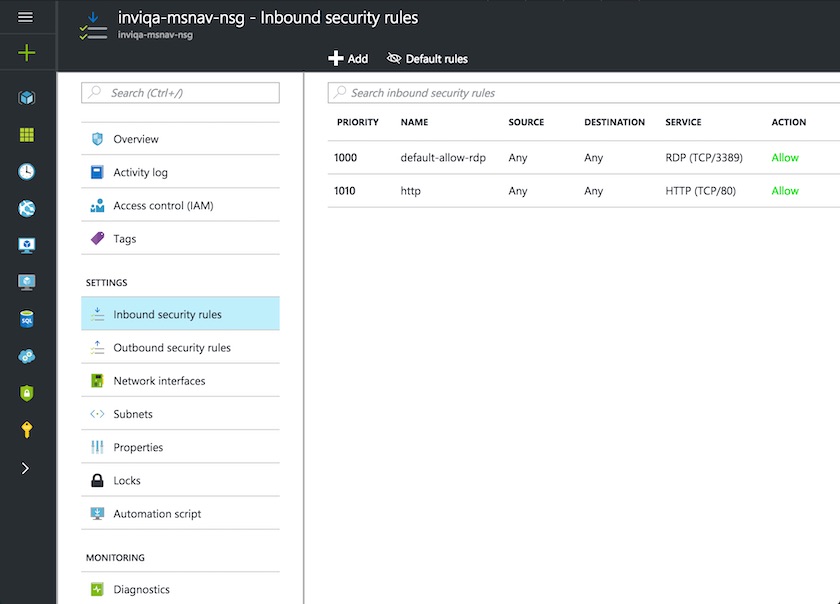
Figure 3.5
The 'Inbound security rules' screen should then reflect all the rules configured.
Connecting to the virtual machine using a RDC client
Now that the VM is running and accessible to the internet, you can log into the machine using a remote desktop client. Windows users have an in-built client, but Mac users will need to download the Microsoft Remote Desktop Connection Client for Mac.
Once installed, you will need to input some connection details from the Azure portal.
| Credential | Description |
|---|---|
| PC name | The public IP address of the Azure VM, along with the RDP port (3389). |
| User name | Windows account user name, as entered when setting up the Azure VM. |
| Password | Windows account Password, as entered when setting up the Azure VM. |
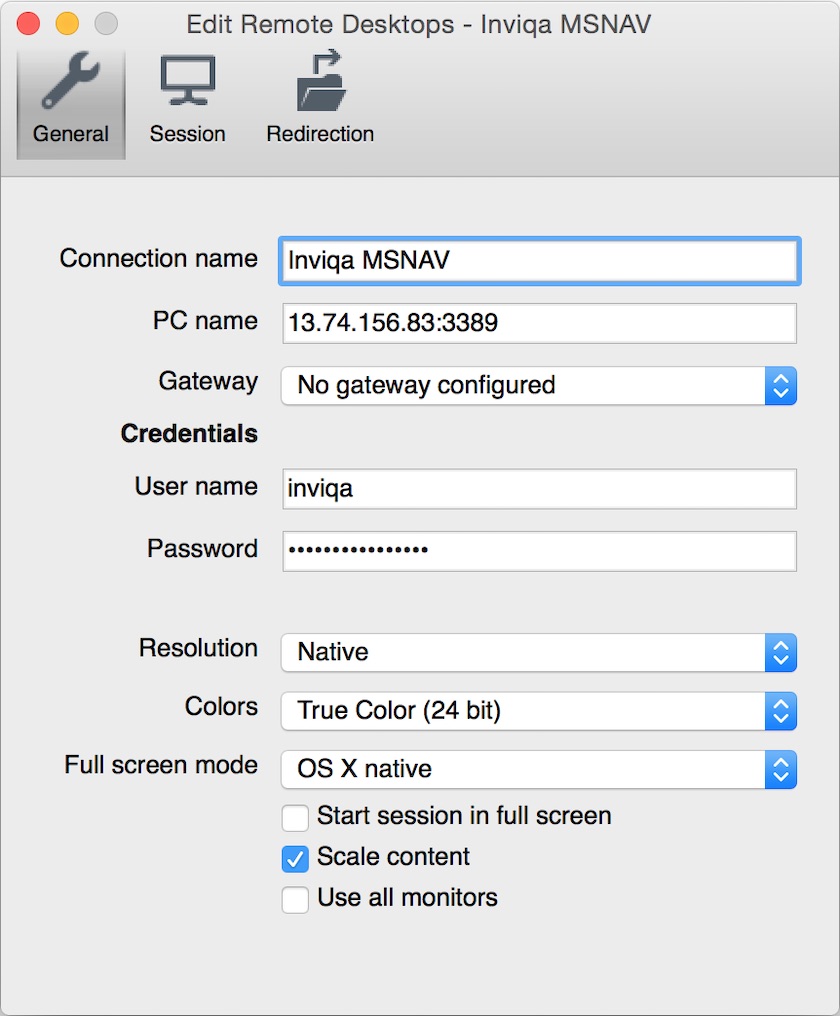
You should then be able to start the connection. You may see a security certificate dialogue, which you will need to approve, and then you will be logged into the Windows account.
Configuring Dynamics NAV
Microsoft have made setting up Dynamics NAV relatively easy by providing a PowerShell script. This can be found in the C:\DEMO folder. Right click on 'Initialize Virtual Machine' and select 'Run with PowerShell' from the contextual menu.
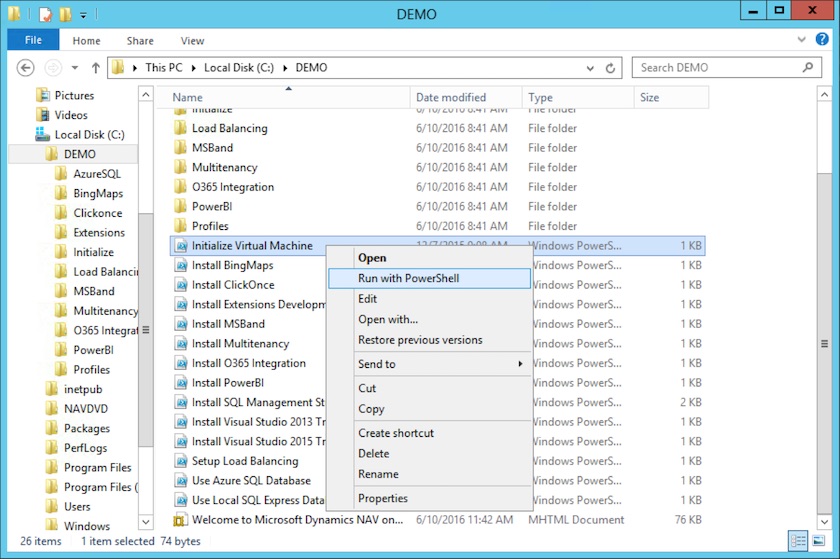
This will launch a PowerShell terminal application, which will prompt you for information, for which the defaults are mostly acceptable for testing purposes. Below is a summary of the prompts and a response where it differed from the default. The DNS name needs to match the one configured on the Azure IP address component (as described above).
| Prompt | Response | Info |
|---|---|---|
Please select NAV Language (AT, AU, BE, CH, CZ, DE, DK, ES, FI, FR, GB, IS, IT, NA, NL, NO, NZ, RU, SE, W1) (Default W1): | GB | The language pack to use. By default it uses W1 (American English). |
| Restore and use Database Bak File From Path/Url (Enter None to avoid restore) (Default C:\NAVDVD\GB\SQLDemoDatabase \CommonAppData\Microsoft \Microsoft Dynamics NAV\90\Database \Demo Database NAV (9-0).bak): | The database backup file to use. By default it uses a demo backup file for the language you chose. | |
| NAV administrator username (Default admin): | This value is needed to access the admin and run SOAP scripts. | |
| NAV administrator password (Default P@ssword1): | This value is needed to access the admin and run SOAP scripts. | |
| What is the public DNS name pointing to your service (Cloud Service Name in classic portal) (Default INVIQA-MSNAV.cloudapp.net): | inviqa-msnav. northeurope.cloudapp. azure.com | This needs to match the DNS name configured in on the Azure IP address component. |
| Certificate Pfx File (Empty for using Self Signed Certificate): | This will generate a self signed certificate which is acceptable for desktop browser testing. |
Once the PowerShell script has completed, you can check the server is configured using the Dynamics NAV management console.
Figure 4.1
Click the Windows start button, then search for 'NAV'. Select 'Dynamics NAV 2016 Administration'.
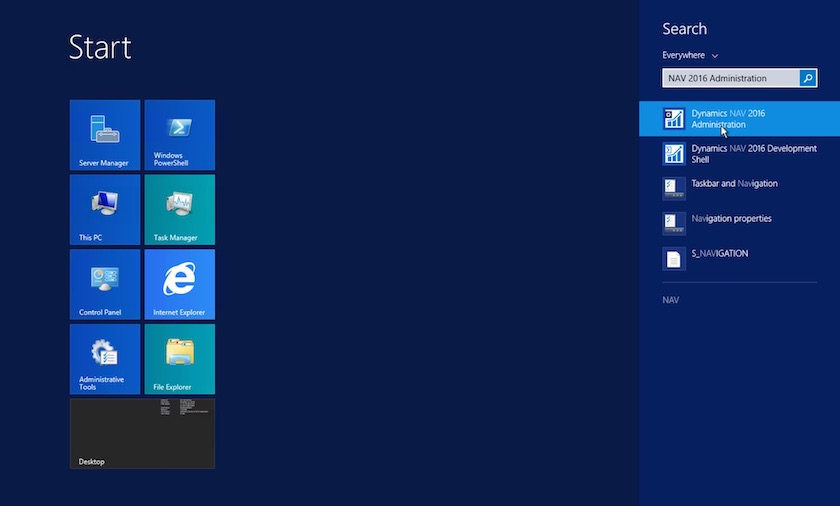
Figure 4.2
When the management console launches, select 'NAV' from the left hand menu to review the settings. In the 'General' tab the Credential Type should be set to 'NavUserPassword', which means that Basic Authentication is being used.
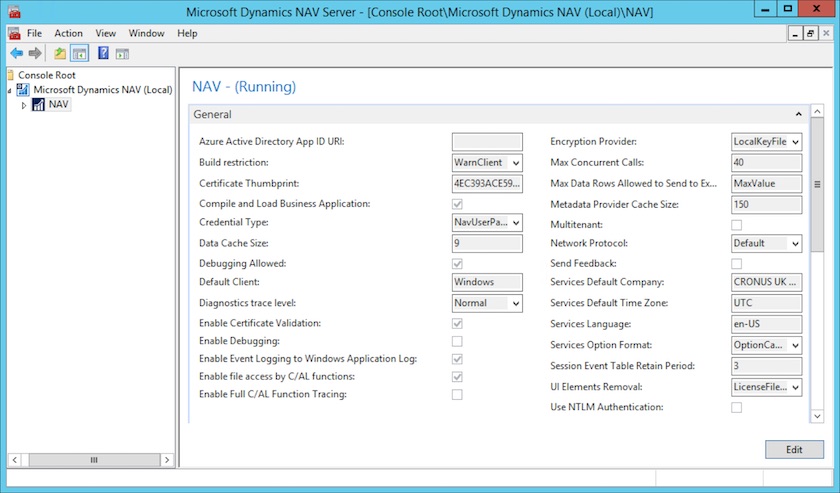
Figure 4.3
Switching to the 'Client Services' tab the 'Web Client Base URL' should be populated according to the DNS name entered during the setup script. In this case the value is 'https://inviqa-msnav.northeurope.cloudapp.azure.com/NAV/WebClient/'.
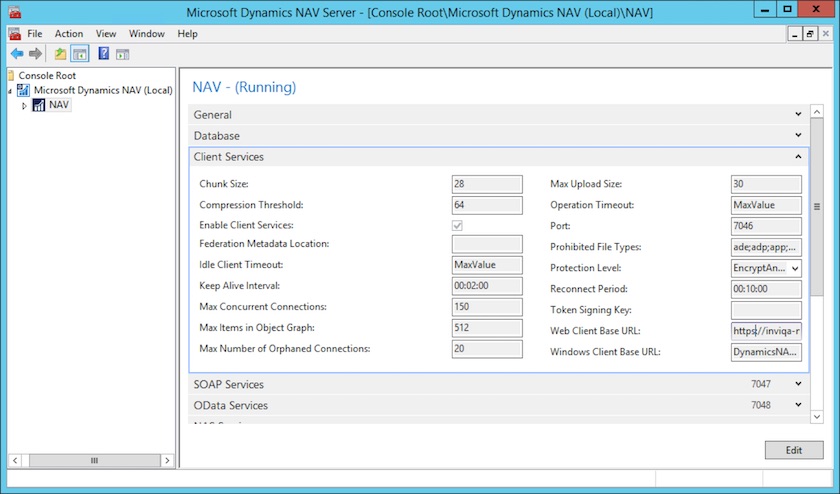
Figure 4.4
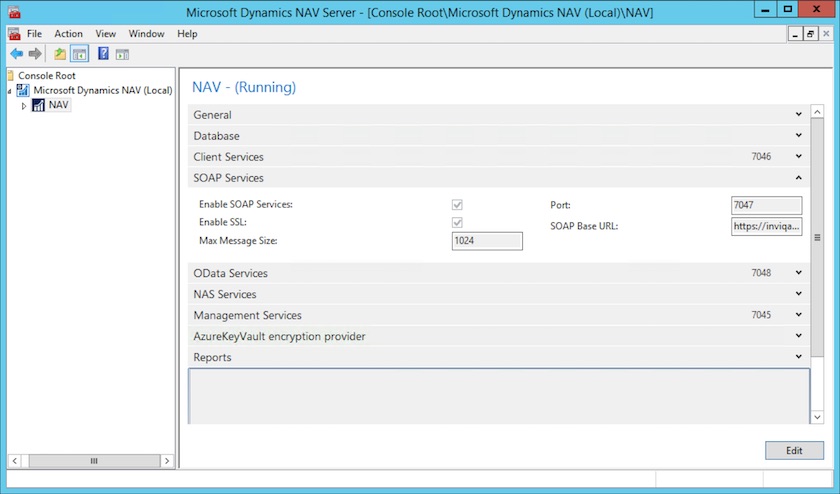
Switching to the 'SOAP Services' tab 'Enable SOAP Services' should be checked and the 'SOAP Base URL' should be populated. In this case the value is 'https://inviqa-msnav.northeurope.cloudapp.azure.com:7047/NAV/WS/'.
Accessing Dynamics NAV
Web client
At this point you should have a working and accessible Dynamics NAV server. It is useful at this stage to login to the web client and familiarise yourself with the application. The URL is as per the Client Services tab, as described above.
Figure 4.1
The user name and password are the defaults from the PowerShell install script, unless specifically overridden. By default they are:
User name: admin
Password: P@ssword1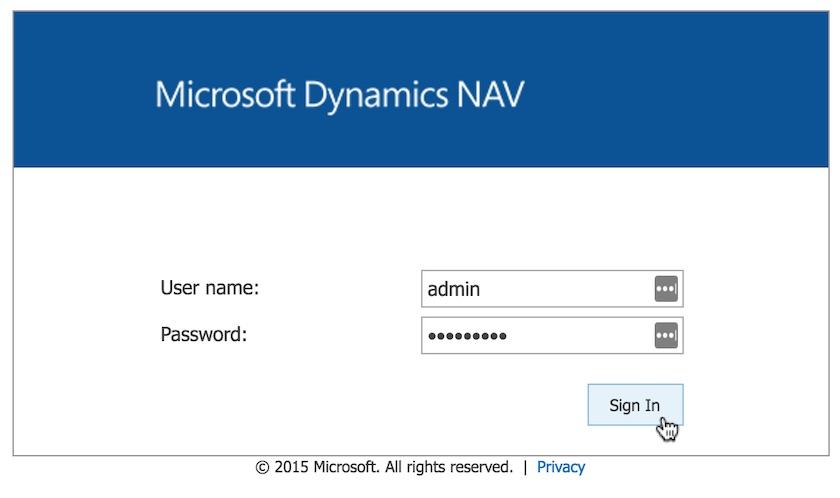
Figure 4.2
Once logged in, the summary screen should become visible. From here you can explore the various sections and get an idea of the kind of data stored in the ERP.
SOAP Service
Overview
The information stored in Dynamics NAV is accessible via a SOAP service. The base URL is as per the SOAP Services tab, as described above. The entrypoint is the service discovery WSDL, which is found at '/Services'. So for the test instance created above, the full URL is:
'https://inviqa-msnav.northeurope.cloudapp.azure.com:7047/NAV/WS/Services'.
The output is as follows:
<discovery xmlns="http://schemas.xmlsoap.org/disco/" xmlns:xsd="http://www.w3.org/2001/XMLSchema" xmlns:xsi="http://www.w3.org/2001/XMLSchema-instance"> <contractRef xmlns="http://schemas.xmlsoap.org/disco/scl/" ref="https://inviqa-msnav.northeurope.cloudapp.azure.com:7047/NAV/WS/SystemService"/> <contractRef xmlns="http://schemas.xmlsoap.org/disco/scl/" ref="https://inviqa-msnav.northeurope.cloudapp.azure.com:7047/NAV/WS/Page/Customer"/> <contractRef xmlns="http://schemas.xmlsoap.org/disco/scl/" ref="https://inviqa-msnav.northeurope.cloudapp.azure.com:7047/NAV/WS/Page/Item"/> <contractRef xmlns="http://schemas.xmlsoap.org/disco/scl/" ref="https://inviqa-msnav.northeurope.cloudapp.azure.com:7047/NAV/WS/Page/MiniSalesInvoice"/> <contractRef xmlns="http://schemas.xmlsoap.org/disco/scl/" ref="https://inviqa-msnav.northeurope.cloudapp.azure.com:7047/NAV/WS/Page/powerbifinance"/> <contractRef xmlns="http://schemas.xmlsoap.org/disco/scl/" ref="https://inviqa-msnav.northeurope.cloudapp.azure.com:7047/NAV/WS/Page/Profile"/> <contractRef xmlns="http://schemas.xmlsoap.org/disco/scl/" ref="https://inviqa-msnav.northeurope.cloudapp.azure.com:7047/NAV/WS/Page/SalesOrder"/> <contractRef xmlns="http://schemas.xmlsoap.org/disco/scl/" ref="https://inviqa-msnav.northeurope.cloudapp.azure.com:7047/NAV/WS/Page/Vendor"/> </discovery> The first service listed is the system service. This allows a SOAP consumer to get a list of companies in the database (NAV supports multiple companies). Each company name can then be used to adapt the SOAP URL to get access to the information about that specific company (described later). If no company is specified and the above URLs are used, the default company is used.
The remaining services listed represent 'pages', which is how NAV organises and displays data. As you can see, pages are used to represent such things as customers ('/Page/Customer'), products ('/Page/Item') and orders ('/Page/SalesOrder'). Each page has a consistent set of basic operations that allow you to interact with the data in a CRUD like fashion.
Using the system service
Here is a basic script that uses the PHP SoapClient to get a list of companies using the system service:
<?php $soapWsdl = 'https://inviqa-msnav.northeurope.cloudapp.azure.com:7047/NAV/WS/SystemService'; try { $options = [ 'soap_version' => SOAP_1_1, 'connection_timeout' => 120, 'login' => 'admin', 'password' => 'P@ssword1', ]; $client = new SoapClient($soapWsdl, $options); $result = $client->Companies(); print_r($result); } catch (Exception $e) { echo $e->getMessage(); } [return_value] => CRONUS UK Ltd.The main things to note here are that we are leveraging the inbuilt support for basic authentication provided by SoapClient. This is done by providing the login credentials to the constructor. Additionally, the script requires SOAP version 1.1 in order to work correctly.
In the test install there is in fact only one company, which is 'CRONUS UK Ltd.'. This also happens to be the default company. However, if it wasn’t the default, the specific discovery WSDL would be derived using the name as follows:
'https://inviqa-msnav.northeurope.cloudapp.azure.com:7047/NAV/WS/CRONUS%2...'.
This then yields a discovery WSDL with a specific set of services:
<discovery xmlns="http://schemas.xmlsoap.org/disco/" xmlns:xsd="http://www.w3.org/2001/XMLSchema" xmlns:xsi="http://www.w3.org/2001/XMLSchema-instance"> <contractRef xmlns="http://schemas.xmlsoap.org/disco/scl/" ref="https://inviqa-msnav.northeurope.cloudapp.azure.com:7047/NAV/WS/CRONUS UK Ltd/SystemService"/> <contractRef xmlns="http://schemas.xmlsoap.org/disco/scl/" ref="https://inviqa-msnav.northeurope.cloudapp.azure.com:7047/NAV/WS/CRONUS UK Ltd/Page/Customer"/> <contractRef xmlns="http://schemas.xmlsoap.org/disco/scl/" ref="https://inviqa-msnav.northeurope.cloudapp.azure.com:7047/NAV/WS/CRONUS UK Ltd/Page/Item"/> <contractRef xmlns="http://schemas.xmlsoap.org/disco/scl/" ref="https://inviqa-msnav.northeurope.cloudapp.azure.com:7047/NAV/WS/CRONUS UK Ltd/Page/MiniSalesInvoice"/> <contractRef xmlns="http://schemas.xmlsoap.org/disco/scl/" ref="https://inviqa-msnav.northeurope.cloudapp.azure.com:7047/NAV/WS/CRONUS UK Ltd/Page/powerbifinance"/> <contractRef xmlns="http://schemas.xmlsoap.org/disco/scl/" ref="https://inviqa-msnav.northeurope.cloudapp.azure.com:7047/NAV/WS/CRONUS UK Ltd/Page/Profile"/> <contractRef xmlns="http://schemas.xmlsoap.org/disco/scl/" ref="https://inviqa-msnav.northeurope.cloudapp.azure.com:7047/NAV/WS/CRONUS UK Ltd/Page/SalesOrder"/> <contractRef xmlns="http://schemas.xmlsoap.org/disco/scl/" ref="https://inviqa-msnav.northeurope.cloudapp.azure.com:7047/NAV/WS/CRONUS UK Ltd/Page/Vendor"/> </discovery> Using the page services
Reading records
Here is a basic script that uses the SoapClient to get a single order using the ReadMultiple operation:
<?php $soapWsdl = 'https://inviqa-msnav.northeurope.cloudapp.azure.com:7047/NAV/WS/CRONUS%20UK%20Ltd/Page/SalesOrder'; try { $options = [ 'soap_version' => SOAP_1_1, 'connection_timeout' => 120, 'login' => 'admin', 'password' => 'P@ssword1', ]; $client = new SoapClient($soapWsdl, $options); $result = $client->ReadMultiple(['filter' => [], 'setSize' => 1]); print_r($result); } catch (Exception $e) { echo $e->getMessage(); } [ReadMultiple_Result] => stdClass Object ( [SalesOrder] => stdClass Object ( [Key] => 32;JAAAAACLAQAAAAJ7BjEAMAAxADAAMAA16;4062531;10;SalesLines1;44;JQAAAACLAQAAAAJ7BjEAMAAxADAAMAA1AAAAAIcQJw==6;4062470; [No] => 101005 [Sell_to_Customer_No] => 30000 [Sell_to_Customer_Name] => John Haddock Insurance Co. [Sell_to_Address] => 10 High Tower Green [Sell_to_City] => Manchester [Sell_to_Post_Code] => MO2 4RT [Sell_to_Contact] => Miss Patricia Doyle -- 8< -- ) ) The main things to observe here are that the specific 'Cronus UK Ltd' company URL has been used, rather than the default URL and that the setSize option has been used to restrict the result to just one record. Additionally, the output has been significantly redacted for the sake of brevity as the result returns every field associated with the record, of which there are a lot.
However, this abundance of information is actually very useful as any of the fields can be used to apply a filter, meaning that once one record is exposed it is easy for a developer to craft the request they need without continually consulting API documentation. Filters are applied to a specified field using a specialised criteria syntax.
The following script adds a filter into the request to restrict the result to orders on or after a certain date. Note: the dates in the default instance seem to all be set in the future.
<?php $soapWsdl = 'https://inviqa-msnav.northeurope.cloudapp.azure.com:7047/NAV/WS/CRONUS%20UK%20Ltd/Page/SalesOrder'; try { $options = [ 'soap_version' => SOAP_1_1, 'connection_timeout' => 120, 'login' => 'admin', 'password' => 'P@ssword1', ]; $client = new SoapClient($soapWsdl, $options); $filter = ['Field' => 'Order_Date', 'Criteria' => '>=01112018']; $result = $client->ReadMultiple(['filter' => $filter, 'setSize' => 3]); print_r($result); } catch (Exception $e) { echo $e->getMessage(); } [ReadMultiple_Result] => stdClass Object ( [SalesOrder] => Array ( [0] => stdClass Object ( [Key] => -- 8< -- [No] => 101005 [Sell_to_Customer_No] => 30000 [Sell_to_Customer_Name] => John Haddock Insurance Co. -- 8< -- [Order_Date] => 2018-01-11 -- 8< -- ) [1] => stdClass Object ( [Key] => -- 8< -- [No] => 101009 [Sell_to_Customer_No] => 38128456 [Sell_to_Customer_Name] => MEMA Ljubljana d.o.o. -- 8< -- [Order_Date] => 2018-01-19 -- 8< -- ) [2] => stdClass Object ( [Key] => -- 8< -- [No] => 101011 [Sell_to_Customer_No] => 43687129 [Sell_to_Customer_Name] => Designstudio Gmunden -- 8< -- [Order_Date] => 2018-01-12 -- 8< -- ) ) ) The criteria syntax in the filter is relatively self explanatory - it is looking for orders with an order date on or after 11/01/2018. One potential pitfall is the date format required, which needs to be mmddyyyy.
The following script uses a combined filter to find customers with a name beginning and ending in the letters 'S' and 's' respectively:
<?php $soapWsdl = 'https://inviqa-msnav.northeurope.cloudapp.azure.com:7047/NAV/WS/CRONUS UK Ltd/Page/Customer'; try { $options = [ 'soap_version' => SOAP_1_1, 'connection_timeout' => 120, 'login' => 'admin', 'password' => 'P@ssword1', ]; $client = new SoapClient($soapWsdl, $options); $filter = ['Field' => 'Name', 'Criteria' => 'S*&*s']; $result = $client->ReadMultiple(['filter' => $filter, 'setSize' => 3]); print_r($result); } catch (Exception $e) { echo $e->getMessage(); }[ReadMultiple_Result] => stdClass Object ( [Customer] => Array ( [0] => stdClass Object ( [Key] => 32;EgAAAAJ7CDAAMQAxADIAMQAyADEAMg==6;3832750; [No] => 01121212 [Name] => Spotsmeyer's Furnishings -- 8< -- ) [1] => stdClass Object ( [Key] => 32;EgAAAAJ7CDIAMQAyADMAMwA1ADcAMg==6;3832860; [No] => 21233572 [Name] => Somadis -- 8< -- ) ) ) The criteria syntax in the filter combines two criteria using an ampersand:'S*' and '*s'. These in turn use the wildcard criteria syntax. This could also be written as '@s*&*s' using an asperand to denote case insensitivity.
Filters can also be combined by creating a multi dimensional array as follows:
$filter = [ 0 => ['Field' => 'Name', 'Criteria' => 'S*'], 1 => ['Field' => 'Name', 'Criteria' => '*s'], ]; $result = $client->ReadMultiple(['filter' => $filter, 'setSize' => 3]); However, this has the effect of looking for customers with a name beginning or ending with 'S' and 's' respectively, which can be achieved in a single expression – 'S*|*s', which uses the pipe as an or operator.
Creating records
Creating records is quite a straightforward process using the Create SOAP operation. There are no minimum data requirements, so a call to Create with no data supplied will just create a bare record in Dynamics NAV with a unique record Key and No field, as demonstrated by the following script:
<?php $soapWsdl = 'https://inviqa-msnav.northeurope.cloudapp.azure.com:7047/NAV/WS/CRONUS UK Ltd/Page/Customer'; try { $options = [ 'soap_version' => SOAP_1_1, 'connection_timeout' => 120, 'login' => 'admin', 'password' => 'P@ssword1', ]; $client = new SoapClient($soapWsdl, $options); $result = $client->Create(['Customer' => '']); print_r($result); } catch (Exception $e) { echo $e->getMessage(); } [Customer] => stdClass Object ( [Key] => 24;EgAAAAJ7/0MAMAAwADAANQAw6;4448270; [No] => C00050 -- 8< -- ) However, some data will need to be stored when creating the record, and this is also quite straightforward:
<?php $soapWsdl = 'https://inviqa-msnav.northeurope.cloudapp.azure.com:7047/NAV/WS/CRONUS UK Ltd/Page/Customer'; try { $options = [ 'soap_version' => SOAP_1_1, 'connection_timeout' => 120, 'login' => 'admin', 'password' => 'P@ssword1', ]; $client = new SoapClient($soapWsdl, $options); $customer = [ 'Name' => 'ACME Corporation', 'Address' => '273 Basin Street', 'City' => 'London', 'Post_Code' => 'N16 34Z', 'Country_Region_Code' => 'GB', ]; $result = $client->Create(['Customer' => $customer]); print_r($result); } catch (Exception $e) { echo $e->getMessage(); } [Customer] => stdClass Object ( [Key] => 24;EgAAAAJ7/0MAMAAwADAANgAw6;4449110; [No] => C00060 [Name] => ACME Corporation [Address] => 273 Basin Street [City] => London [Post_Code] => N16 34Z [Country_Region_Code] => GB -- 8< -- ) Here we see the supplied company name and address information reflected in the customer record that is created.
Updating records
Updating records is also quite a straightforward process using the Update SOAP operation. In order to identify the correct record the Key field must be supplied, along with the field or fields that need updating. There's no need to re-upload the entire record; any fields not supplied will remain as they are, as demonstrated by the following script:
<?php $soapWsdl = 'https://inviqa-msnav.northeurope.cloudapp.azure.com:7047/NAV/WS/CRONUS UK Ltd/Page/Customer'; try { $options = [ 'soap_version' => SOAP_1_1, 'connection_timeout' => 120, 'login' => 'admin', 'password' => 'P@ssword1', ]; $client = new SoapClient($soapWsdl, $options); $customer = [ 'Key' => '24;EgAAAAJ7/0MAMAAwADAANgAw6;4449110;', 'Address' => '999 Basin Street', ]; $result = $client->Update(['Customer' => $customer]); print_r($result); } catch (Exception $e) { echo $e->getMessage(); } [Customer] => stdClass Object ( [Key] => 24;EgAAAAJ7/0MAMAAwADAANgAw6;4449540; [No] => C00060 [Name] => ACME Corporation [Address] => 999 Basin Street [City] => London [Post_Code] => N16 34Z [Country_Region_Code] => GB -- 8< -- ) Here we use the customer record created above and can see that just the Address field of the record is updated. Notice also that the latter section of the Key has changed after the update from 4449110 to 4449540. This revision indicator is important as as any attempt to perform a record update or delete now requires the revised Key, or the action will be rejected.
Deleting records
Deleting records follows a similar pattern to above, using the Delete SOAP operation. However, as mentioned above, the latest Key revision is required to perform the action.
<?php $soapWsdl = 'https://inviqa-msnav.northeurope.cloudapp.azure.com:7047/NAV/WS/CRONUS UK Ltd/Page/Customer'; try { $options = [ 'soap_version' => SOAP_1_1, 'connection_timeout' => 120, 'login' => 'admin', 'password' => 'P@ssword1', ]; $client = new SoapClient($soapWsdl, $options); $result = $client->Read(['No' => 'C00060']); print_r($result); $key = $result->Customer->Key; $result = $client->Delete(['Key' => $key]); print_r($result); } catch (Exception $e) { echo $e->getMessage(); } [Customer] => stdClass Object ( [Key] => 24;EgAAAAJ7/0MAMAAwADAANgAw6;4449540; [No] => C00060 [Name] => ACME Corporation [Address] => 999 Basin Street [City] => London [Post_Code] => N16 34Z [Country_Region_Code] => GB -- 8< -- ) [Delete_Result] => 1 Here we use the customer No field to perform a Read operation to get the latest version of the Key, before using it to perform a Delete operation.
Conclusion
Hopefully this overview provides you with enough information to allow you to get started with an Dynamics NAV integration project.
The Azure platform makes it easy to create a application to investigate and test against, breaking down the barriers that proprietary platforms and software usually present to open source users.
The SOAP service provides a uniform way to interact with the 'pages' inside the NAV system, with filters allowing a SOAP client to query data in a flexible way and create / update / delete operations allowing the data to be easily manipulated.


