Magento 2 tutorial: how to create a command line module
In this tutorial we explore how to create a Magento 2 (now known as Magento Commerce/Magento Open Source) Command Line module. And we focus on the new and exciting addition to the Magento 2 framework that is the Magento bin file!
In this guide we walk through what's required to build a module for Magento 2. We'll use Composer to install our module, building on where we started with our guide to the Magento 2 backend. We'll also begin to explore more advanced subjects including autoloading, factories, proxies, and code generation.
A quick disclaimer: please note that this guide was first published ahead of Magento 2's general availability, and therefore it may be subject subject to amendments.
Before we begin, we will need an environment to use. I am opting for Vagrant using a standard build that mounts a folder that contains Magento 2.
How you want to achieve this is up to you, but I recommend using Alan Kent’s image as it is super simple to get up and running. If you are unsure how to install Magento 2 (now known as Magento Commerce/Magento Open Source) just yet, don’t worry. Head back to our first guide on using Composer to install Magento 2 to get started.
Magento 2 Generators
In our experience, one of the best ways to find your way around a new technology is to learn with a real-life example. Rather than just telling you how to build a module in Magento 2, we decided to build one ourselves and document the process.
We decided on a module called Magento 2 Generators. We hope that this guide will introduce some new areas in Magento 2, but also that the module itself will become a well-used tool like the Laravel generators. If you are familiar with Laravel, or to some extent, Symfony or Doctrine, you will be used to using a Command Line tool – either artisan or symfony console – to auto-generate code files.
Laravel, especially, has the Laravel 4 Generators project, which is probably one of the first packages I install when working with Laravel 4. Laravel 5 took this a step further and has the generator commands built into the framework.
So what exactly are we building?
Our module will add new commands to the standard Magento 2 CLI application bin/ magento. The new commands will create skeleton classes based on the namespace and type of class we want to generate. Let’s look at an example:
php bin/magento generate:controller SessionDigital\ LearnMagentoCLI\IndexBy running this command, we should see a new class created within: app/code/SessionDigital/LearnMagentoCLI/Controllers/Index.php
This will include all of the boilerplate code that is required to run a controller.
Magento 2 Module Project Plan
Now we know what we are planning to build, what do we need to do within Magento 2 to get this working?
The good news is that Magento decided that the core framework should use more packages created by the community. The Magento team has included the symfony2/ console component for developers working with CLI applications, which makes working with CLI scripts really easy. There is no need to write input / outputhandlers as this is all handled for us. We just need to register the new command via dependency injection, and from there we can start writing our first commands.
Dependency injection is also new to Magento 2 and we will look at some basic uses of constructor injection and di.xml configuration in this guide.
Magento 2 Folder Structure
Before we start working on our custom module, it’s useful to recap how Magento 2 (now known as Magento Commerce/Magento Open Source) code is structured.
There are some conventions that have been ported over from Magento 1, but it’s always handy to recap the basics with a new system such as this.
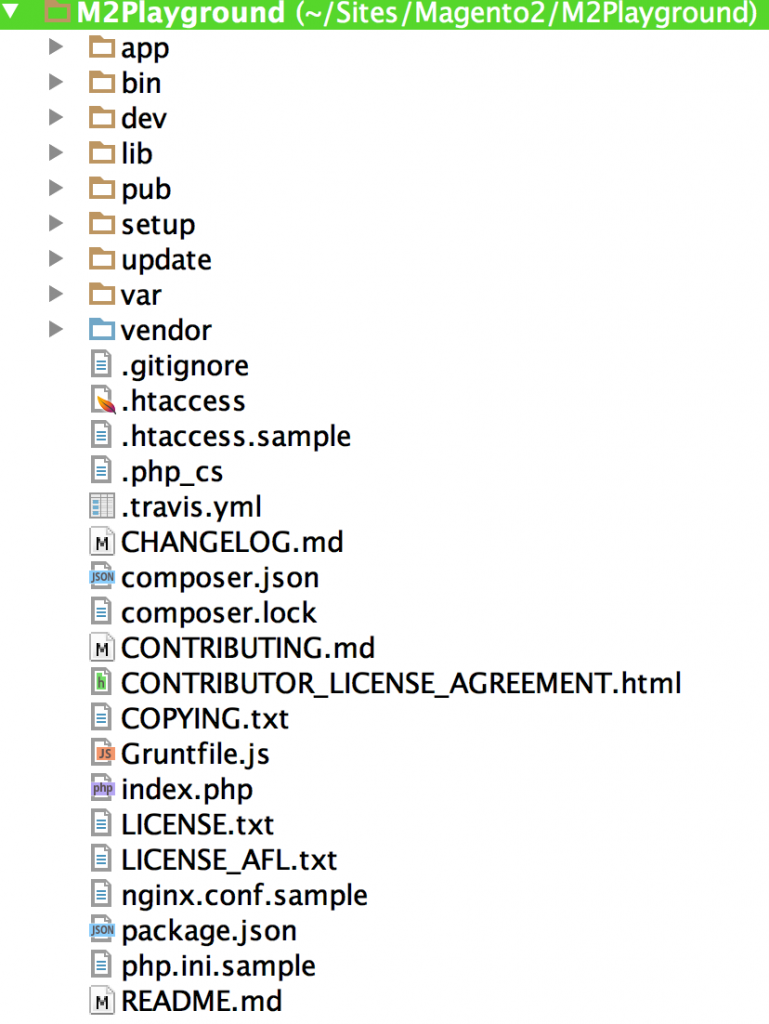
app
app is one of the main locations within Magento 2. It contains all of our Application Logicso inside of app, you will see:
.htaccess– Ensures that contents are not readable via a web browser.autoload.php– Handles registering of the autoloaders used by Magento 2.bootstrap.php– Starts the bootstrap process.functions.php– Registers global functions that are used throughout the application. Mainly the creation of value objects: E.g.
function __()
{
...
}code– This folder is where all of our code will be placed.design– When working on themes, this is the place for you. Not only is your project located here, but you will also find the core Magento themes separated into frontend and admin sections.etc– If you’re looking for project configuration, you will find it here.il8n– Translations are kept here.
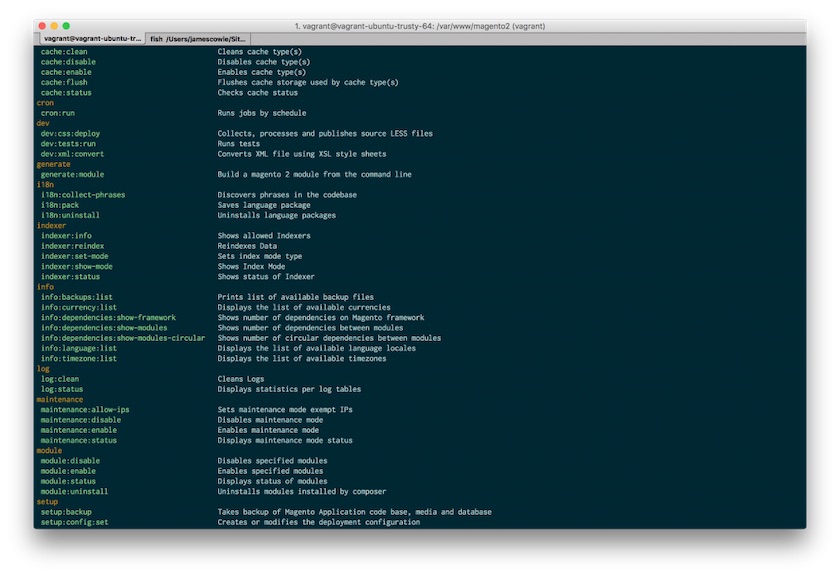
bin
The bin directory is used for any binary files that are executable. The only Magento file in the bin directory is the Magento 2 CLI command that is used to run many maintenance tasks such as cache clearing, installing Magento, or running the indexers. There are many more commands, and this is where we will be looking to add functionality with our module. 12
lib
The lib folder is similar to its equivalent in Magento 1. It contains the main framework for Magento as well as some core libraries that are required. The Magento 2 training videos suggest that you should use this folder to install extra libraries into the system. Instead, I suggest that you should only use this folder if you can’t make a Composer package out of your library.
pub
The public folder is where your web server should point. Inside this directory are all of the auto-generated frontend assets that are used to render the site. It’s important to ensure the write permissions are set on these folders, otherwise you will run into some issues. But there is no active development done inside this directory. Instead, it’s used by Magento to place all assets that are needed. While in development mode, frontend assets are generated in real time; in fact, during development, you might find yourself running rm-rf pub/static/frontend/Theme.
However, when you go into production having assets generated in real time, you would add too much overhead to page loads, so php bin/magento setup:staticcontent:deploy generates these assets on deployment. While we are talking about this command, it is worth noting that we only need to run this when we are operating in production mode. When in default or development modes, these assets are automatically generated on each request.
setup
This folder is only ever needed when you install Magento 2. As with Magento 1, you can customise the install process, but with the ease of using the web installer or the CLI, there is little to do in this folder.
var
As with Magento 1, the var folder contains all of the cache assets and auto-generated class files etc. Anything that Magento creates (other than the generated CSS, JS etc.) will be found in this folder. It also contains the log and report directories so, if you have an exception log or debug info you want to see, take a look in this directory. Folders such as page_cache and cache are easy to understand. However, you will see a folder called generation and di. Don’t worry if you do not see the di folder. You will only see this if you have compiled the DI container via the CLI and are working in production mode.
These folders contain the compiled dependency injection container, as well as all of the generated factories that Magento needs to function. Again, during developer mode, these assets are generated in real-time, yet, when you move to production, there are more commands to run. Don’t worry about these commands for now as we will cover them in future guides about deployment process in Magento 2. You can sign up here to be notified when future guides are available.
Vendor
If you have read the previous guide, you will know that this folder is generated by Composer and contains all of the dependencies that are defined within the composer.json file.
A warning to all: this folder is considered volatile, so don’t expect any changes you make in here to remain if you run composer update.
Magento 2 Module Structure
It’s now time to look at how we can add our own modules.
If you look inside the app/code folder, you will notice straight away that there are no code pools. No community, core, or local. In Magento 2, code pools are no longer required.
While working on Magento 2 modules we need to get into the mindset that a module should be self-contained and implement a full feature. In Magento 1, it was easy to share features between modules as there was no real way of enforcing otherwise.
We could push logic into the theme directories and before we knew it, what started as a single module became intertwined into many. Magento 2 brings all of the required files within a single namespace as well as dependencies managed via Composer. Try to think of a module as doing just one thing, and that one thing well.
So let’s get started by creating our first module folder and I will explain some of the folders that we will need and their purpose in Magento 2 Create a new folder within app/code called PocketGuide/Generators. The full path for this should look like the following: app/code/PocketGuide/Generators.
Module configuration
The first folder we will need is the age old etc folder. As in Magento 1, this folder is used to configure the module. There are more additions in Magento 2, such as the di.xml file that we will see shortly, but let’s start by creating a new folder etc. Within this, we need to create our module’s configuration file, module.xml.
Within our XML document we need to define the XML version, so let’s add this to our file:
<?xml version=“1.0”?>Next up, we want to include the path to the XSD file, which validates our document:
<config xmlns:xsi=“http://www.w3.org/2001/XMLSchema-instance”
xsi:noNamespaceSchemaLocation=“../../../../../lib/internal/
Magento/Framework/Module/etc/module.xsd”>
If we use a modern IDE, this XSD file will be included by the IDE and will validate the XML we are creating and warn us earlier of potential errors. It also has the added benefit of providing autocomplete for the XML document.
The next line we need to add will define our module’s name and its version number. This will be used by Magento to process install or upgrade scripts.
<module name=“PockerGuide_Generators” setup_version=”0.0.1”/>While we are looking at version numbers, I would like to introduce you to Semantic Versioning (Semver). We often see version numbers as just numbers, but they are lots more. A version number can indicate its stability and a module’s upgrade path. You can read more via the official website, but Semver uses:
- Major – A feature complete new release. Can introduce breaking changes between major releases 16
- Minor – Non-breaking changes and small incremental updates in functionality
- Patch – Bug fixing
Semantic Versioning is being widely adopted both within the Magento 2 (now known as Magento Commerce/Magento Open Source) core and the wider software community so it is beneficial to know and use this practice. Other benefits include an understandable versioning system that is portable between projects, Visibility of backwards compatibility breaks as well as clear visibility of minor and major release versions.
To return to the tutorial, you now need to close the opening config node.
</config>The complete file should look the same as below:
<?xml version=“1.0”?>
<config xmlns:xsi=“http://www.w3.org/2001/XMLSchema-instance”
xsi:noNamespaceSchemaLocation=“../../../../../lib/internal/
Magento/Framework/Module/etc/module.xsd”>
 <module name=“PocketGuide_Generators” setup_
version=“0.0.1”/>
</config>
Now we have our module configured and registered, let’s take a look at what folders we can expect to see in a Magento 2 module.
API
The API folder is a new addition to Magento 2. Magento 2 now supports and encourages developers to create interfaces. Interfaces or Service Contracts in Magento 2 language are used to define the public API of a class. This is a really important addition to Magento, as not only do interfaces help us with testing, but it also makes developers think about backward compatibility breaks within modules. What do I mean here? Well, if we create an interface with well-defined public methods, any other module can rely on these to work. In our module we can modify the behaviour without having to change the public methods.
All of the Magento 2 (now Magento Commerce/Magento Open Source) modules have Service Contracts and they are used extensively throughout the code. If we look at the CMS module there is a BlockRepositoryInterface that defines how we can perform basic CRUD on blocks:
<?php
namespace Magento\Cms\Api;
use Magento\Framework\Api\SearchCriteriaInterface;
/**
 * CMS block CRUD interface.
* @api
*/
interface BlockRepositoryInterface
{
 public function save(Data\BlockInterface $block);
 public function getById($blockId);
 public function getList(\Magento\Framework\Api\
SearchCriteriaInterface $searchCriteria);
 public function delete(Data\BlockInterface $block);
 public function deleteById($blockId);
}
If you are new to interfaces in PHP, there are lots of great resources available, such as:
- Object interfaces – php.net functionality
- Why you should always use PHP interfaces – Dave Garner
Block
Just as the name suggests, here are the block classes that will be our layer between the back-end and the frontend. This folder is used again for both front-end blocks and adminhtml blocks.
Controller
Controllers are where we convert a request into a response. They work a little differently to how they are used in in Magento 1, and this is an area we will explore lots more when we get around to implementing frontend and admin routes.
etc
We have already had a quick look at this folder. However, there is much more to it than just module.xml. We can configure our dependency injection, adminhtml configuration, and frontend configuration, as well as lots, lots more. We will look at each of these in more depth through the course of these guides.
Helper
Just like in Magento 1, this is the folder where we place all of our general purpose helpers than can be called from any location.
il8n
Module-specific translations should be placed in this folder. That way, on a per-installation basis, they can be modified globally.
Model
Models have changed considerably in Magento 2, but that is for another guide. For now, all we need to know is that models are used for data modelling.
Test
All good modules need tests and they should be in the module’s folder so they can be run against any build. This folder includes the unit integration and, where possible, functional tests. Magento 2 comes with lots of tests that can be used for reference and, with the use of Dependency Injection, it makes using testing frameworks more attainable.
Setup
The install and upgrade process in Magento 2 is different than Magento 1. For now just know that if you want to run scripts to install or upgrade both data and schemas, they are placed in here.
View
This folder is new for Magento 2. In Magento 1 we were used to adding our view files or template in the base or theme directory. However, in Magento 2 we place our templates, JS and CSS (LESS) with the module, so there is no longer a complex process of distributing modules. However, theme-specific changes are still added within the app/design folder. This is only used for setting some default templates/ styles when distributing our modules.
Composer.json
Not all modules will require a composer.json file. If you never plan on using this module on any other project, it is fine to omit it. However, this file is used by Composer to install the module and, with Magento 2, it contains extra information that tells Magento how to install the module. Note: If you never want to distribute your module, but your module depends on packages from Packagist, then you still need a composer.json file to manage the modules dependencies.
So now we know what a Magento 2 module looks like. We have configured our module with a module.xml file, so now it is possible for Magento 2 to know that our module exists. If we ran& php bin/magento setup:upgrade from the environment we have configured, we should see our module name listed in the output.
Adding Composer to the Module
We know that we want to use a Filesystem library within our module, and we also want to use PhpSpec while writing it, so let’s create a composer.json file in the root of our module.
{
 “name”: “PocketGuide/Generators”,
 “description”: “Generate new classes for M2”,
 “license”: “MIT”,
 “type”: “magento2-module”,
}
Let’s talk about what we have got so far. Each package needs a name that Composer can reference. It needs a description so humans know what it does. We always need a license so we know how we can use the module. Finally, and most importantly, we need the type. The type magento2-module is unique to Magento 2 and it is read by the additional Magento 2 hooks to Composer that will place the files in the correct location.
Require
So we know that we can use Composer to install packages that will make development easier (“easier” in the sense that we are not rewriting everything from scratch; we can use community packages in our work). Now let’s pull in a symfony package for filesystem, as well as a yaml configuration, just in case we want to add some configuration options. Open up your composer.json file and add the following:
“require”: {
 “php”: “>=5.4.0”,
 “symfony/yaml”: “2.*”,
 “symfony/filesystem”: “~2”,
 “composer/composer”: “1.0.0-alpha10”
},
We want to ensure people can only install this module if they are using PHP 5.4 or above. We want yaml and filesystem and, because Magento 2 installs modules via Composer, we need to include the Composer package.
Require dev
We also want to include some packages while developing our module, but we don’t want these dependencies to ever make it to production. For this, Composer has the helpful section of require-dev.When installing on the production environment, we can use the –no-dev switch to exclude these packages from reaching production.
Add the below to your composer.json file under the require section:
“require-dev”: {
 “phpspec/phpspec”: “~2.0”,
 “phpunit/phpunit”: “~3.7”,
 “magento/magento2ce”: “1.0.0-beta”
},
“repositories”: [
 {
 “type”: “git”,
 “url”: “https://github.com/magento/magento2”
 }
]
Let’s talk through what we are installing. PhpSpec will help us design our code. PHPUnit is included for its assertion library, and we also include Magento 2 as a module dependency so we can reliably mock what parts of Magento 2 we need. But, because Magento 2 is not part of the Packagist repository, we need to add it as a repository within composer.json, so Composer knows where to install it from.
Let Magento know how to install the module
At the time of writing this guide and while working from the merchant_beta branch of Magento 2, there is no method to autoload modules from the vendor directory. This has been introduced in the Magento 2 develop, but for now I will show how we move modules into our code base.
Before we had to include Composer as a dependency. This was so we can use extra commands to move modules around:
“extra”: {
 “map”: [
 [
 “*”,
 “PocketGuide/Generators”
 ]
 ]
}
By adding the above to your composer.json file, Composer will know to move all of the files from this directory into PocketGuide/Generators within app/code when someone installs the module.
Autoloading for development
I mentioned earlier that we require Magento 2 as a dependency so that we can mock objects. We need to autoload Magento 2 and framework, in order to do this. We use Composer’s autoloading methods to achieve this. Open up composer.json for the last time and add the following:
“autoload”: {
 “psr-4”: {
 “PocketGuide\\Generators\\”: “.”
 }
},
“autoload-dev”: {
 “psr-4”: {
 “PocketGuide\\Generators\\”: “.”,
 “Magento\\” : “vendor/magento/magento2ce/app/code/”,
 “Magento\\Framework\\”: “vendor/magento/magento2ce/lib/
internal/”
 }
}
There is not much to explain here, but in a nutshell we are adding PocketGuide Magento and framework to Composer’s autoloader that PhpSpec can use to autoload the files. You can read more about PSR standards here.\
Building a Magento 2 Module
So far we have looked at configuration and our module’s requirements. Now it’s time to start adding some code to make the module do what we want. While writing code, we should think about the design and behaviour using PhpSpec. If you have followed Magento 2’s development, you will know that the core is covered with PHPUnit tests. However, for this guide we are going to use the BDD (Behaviour Driven Development) approach to testing using PhpSpec.
Configure PhpSpec
So now we want to start using PhpSpec to help design and test our module. If you are new to PhpSpec there are many good tutorials online that can help you get started, such as this.
Because of the module structure we are using for this tutorial, we need to configure PhpSpec to know where to place files that are going to be generated. Create a file phpspec.yml in the root of the module app/code/PocketGuide/Generators with the following content:
suites:
 generator_suite:
 namespace: PocketGuide\Generators
 psr4_prefix: PocketGuide\Generators
 src_path: .
This will:
- Register a suite that PhpSpec will use to generate classes of our namespace.
- Define the namespace we want to use as well as a PSR-4 namespace.
- Tell PhpSpec where to generate the classes.
If we did not have this configuration, PhpSpec would try to create the classes within a srcfolder.
Registering the commands
Magento 2 (now Magento Commerce/Magento Open Source) uses Symfony’s console command package so it makes handling CLI applications really simple. We need to start by creating our first command. Create a Commands folder within our module:
app/code/PocketGuide/Generators/Commands/GeneratorCommand.phpYou should then have a class that looks like this:
<?php
namespace PocketGuide\Generators\Commands;
class GeneratorCommand
{
}
This is nothing special – special just a empty class with our namespace. Let’s start to add some of the other classes that are required to make the CLI work.
Below the namespace add:
use Symfony\Component\Console\Input\InputInterface;
use Symfony\Component\Console\Input\InputArgument;
use Symfony\Component\Console\Input\InputOption;
use Symfony\Component\Console\Output\OutputInterface;
use Symfony\Component\Console\Command\Command;
These are all the extra classes that will handle Input and Output within our CLI command.
We then need to extend from the Command class:
class GeneratorCommand extends CommandLet’s add a constructor into our class. Over time we will use the constructor to inject dependencies, but for now it’s very basic and just calls the parents construct method:
 function __construct()
{
 parent::__construct();
}
The Command class that we extended requires that we set some configuration information. This is what is shown when we run the Command and is also used to add command options to the CLI.
protected function configure()
{
 $this->setName(‘generate:module’);
 $this->setDescription
 (‘Build a magento 2 module from the command line’);
 $this->addArgument(
 ‘name’,
 InputArgument::REQUIRED,
 ‘Module Name ( Test/Module/ ) ‘
 );
 parent::configure();
}
Begin by setting a name for the command. This is what we will type at the Command Line to invoke this class. Then set a description so people using the CLI will know the intended purpose of this command. Next, add an argument this is the input we expect. Here, we want the name that will reference a module we want to generate. Finally execute the CLI method using the execute method:
protected function execute(InputInterface $input,
OutputInterface $output)
{
 $output->writeln(“Hello from generators”);
}
To get started, use the helper method from output to write this handle’s output to the CLI formatting.
Running the CLI command
If we head back to the CLI and try to run php bin/magento and look for our command, we will be very disappointed. We will not see our command listed, but fear not, only one final piece of configuration is required to get our CLI working.
Welcome to di.xml
In order to register our command with Magento 2, you will need to create a di.xml file within the etc folder. This will inject the command into the command array that is used to create the command options. If we did not inject this dependency, we would have to create new objects in lots of classes, which would become tightly coupled and less maintainable.
Create the file app/code/PocketGuide/Generators/etc/di.xml with the following content:
<config xmlns:xsi=”http://www.w3.org/2001/XMLSchema-instance”
xsi:noNamespaceSchemaLocation=”../../../../../lib/internal/
Magento/Framework/ObjectManager/etc/config.xsd”>
 <type name=”Magento\Framework\Console\CommandList”>
 <arguments>
 <argument name=”commands” xsi:type=”array”>
 <item name=”moduleCommand”
xsi:type=”object”>PocketGuide\Generators\Commands\
GeneratorCommand</item>
 </argument>
 </arguments>
 </type>
</config>
Although this may look confusing to start with, all we are doing is instructing Magento 2’s DI container to add a new argument to Magento\Framework\Console\ CommandList.
The structure of the the di.xml file takes type – this being the class we want to inject into. We then add arguments, think of these as options that we want to add to the class. This time, we want to add an argument name commands and we want this argument to be an array so we use the node type. We then add an item to the array of moduleCommand. This is a reference to the Generator Command class that we just created.
Now because we have created a module, we want to head back to the CLI and run: php bin/magento setup:upgrade. This command will parse all the modules etc/module.xml files and register the modules in app/etc/env.php. We can then run php/bin magento and we will see our command.
If we try to run the CLI command with no options, we will receive an error message because the Symfony command requires us to implement a help message: php bin/ magento generate:module.
If we try to run the CLI command with no options, we will receive an error message because the Symfony command requires us to implement a help message: php bin/ magento generate:module.
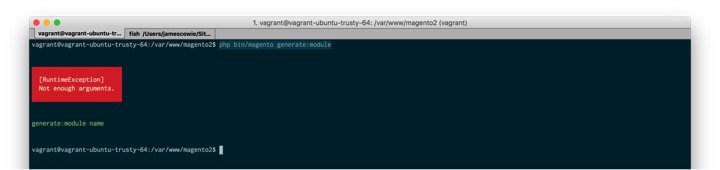
You can correct this by running the same command with some options: php bin/ magento generate:module test
Pretty cool, hey? Even though it’s not doing a great deal, we have seen how we can quickly and conveniently create new CLI options for Magento 2. Next, we’ll look at how to create some classes that will actually do something.
Writing our first spec and adding some models
Now we have our CLI command working, let’s start by creating some models that we can inject to add more behaviour to the command.
First, we need is to generate a module folder. You’ll then see a command that looks like the following:
php bin/magento generate:module James/TestI would expect this to create app/code/James/Test folder. You can then start to run more commands from here that will add Controllers, Blocks, Models etc.
Fire up a terminal and let’s describe some behaviour we want in our module:
phpspec describe PocketGuide/Generators/Model/
ModuleFolderGenerator
If you have PhpSpec configured based on the section above, you should see this output in your terminal. If not, it either means you don’t have phpspec.yml configured correctly or Composer autoloader is not registered. Try running composer dump-autoloader.
Now that we have our first spec, we can run PhpSpec and it should generate our first Model Class. Run using phpspec run.
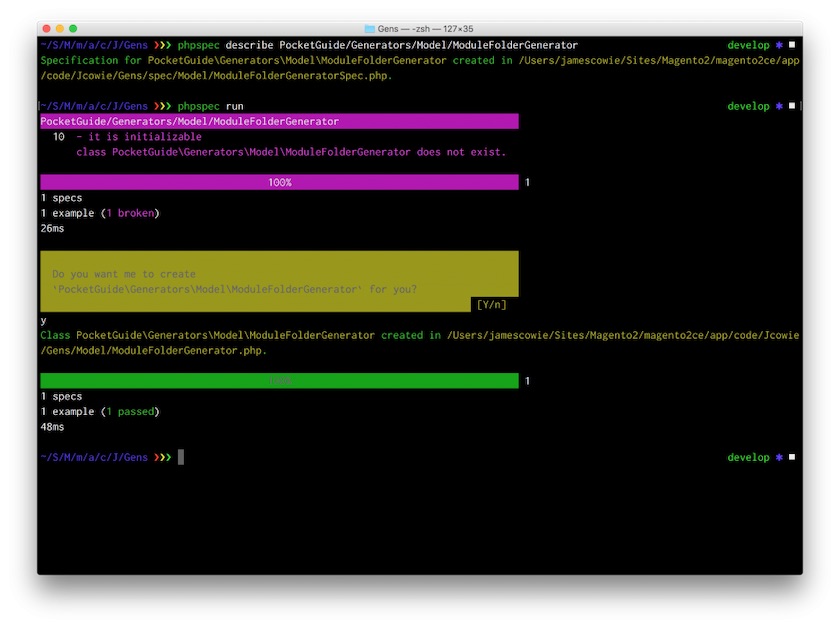
By answering ‘Yes’ to the Command Line prompts, you will see the above output and have a nice new class:
app/code/PocketGuide/Generators/Model/ModuleFolderGenerator.phpUpdating our specification
Now let’s open up PocketGuide/Generators/spec/Model/ ModuleFolderGeneratorSpec.php and start describing the required behaviour of this class.
Because we are going to be using the Filesystem package, we need to tell PhpSpec that this will be injected into the constructor. We do this by using the PhpSpec let method. If you are used to PHPUnit, think of this as the setup method.
function let(\Symfony\Component\Filesystem\Filesystem
$filesystem)
{
 $this->beConstructedWith($filesystem);
}
All we are doing here is creating a mock of the FileSystem package and telling PhpSpec that we always want our spec to be constructed with this mock.
Now let’s describe some more behaviour. If someone tries to generate a module with a name that already exists, we want to throw an exception.
function it_should_throw_an_exception_if_a_module_folder_
already_exists($filesystem)
{
 $path = ‘app/code/test/test/’;
 $filesystem->exists($path)->willReturn(true);
 $this->shouldThrow(new \Exception(“Error module already
exists”))->duringMake($path);
}
Let’s break this down a little as there is a lot happening. We start by describing our behaviour in the function’s name using underscores. This is just a PhpSpec convention. Into this function we pass our mocked FileSystem class.
We then set a path variable that we expect to be already created. We then call the exists method on the mocked FileSystem class, set, and say that anytime this is called it will always return true.
Finally, when we call the method make, and pass in the $path variable, we expect an exception to be thrown.
Now run PhpSpec again (phpspec run). You should see the following output:
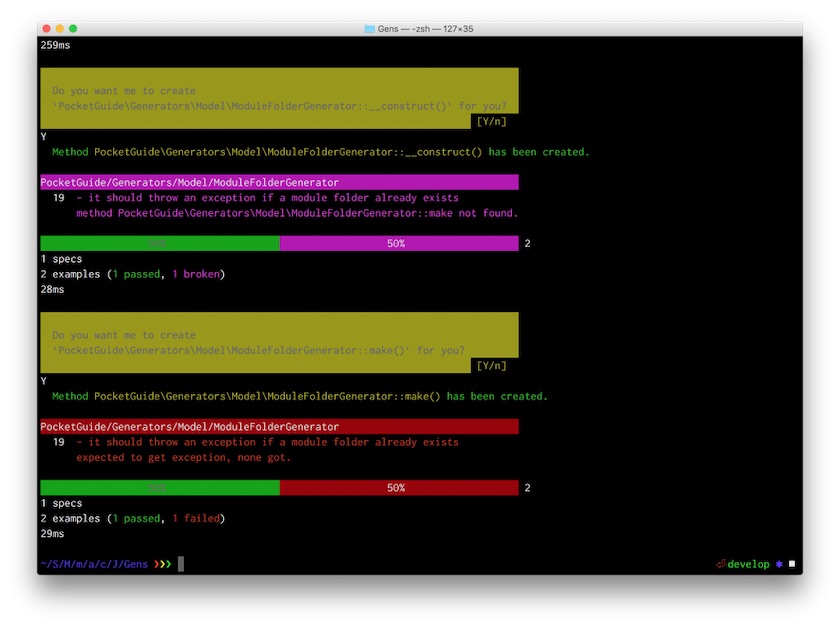
PhpSpec saw that our class had no constructor so it asked if we wanted this to be created for us. It also saw that in the class there was no make method so it prompted us to create this again. Finally, it tried to run the class and expected an exception to be thrown, but this did not happen so we have a failing example.
If you open up: PocketGuide/Generators/Model/ModuleFolderGenerator.php you should see a class that looks like:
<?php
namespace PocketGuide\Generators\Model;
class ModuleFolderGenerator
{
 public function __construct($argument1)
 {
 // TODO: write logic here
 }
 public function make($argument1)
 {
 // TODO: write logic here
 }
}
If you are following the Red / Green / Refactor TDD cycle, you will know that we need to get this test back to green as fast as possible. To do this, we need to start adding some logic. We know that we need the FileSystem package so let’s add that:
use \Symfony\Component\Filesystem\Filesystem;Now let’s inject that into our constructor and assign it to a private variable so we can use it within our class:
/** @var Filesystem $filesystem */
private $filesystem;
public function __construct(Filesystem $filesystem)
{
 $this->filesystem = $filesystem;
}
Again, there is nothing fancy here. We just pass in the reference to Filesystem and in the constructor, we assign it to the private variable filesystem so that it can be used in the class. Now we want to modify the make function so that if a folder exists we throw an exception. Filesystem has a helper method for exist that will check the existence of the file and folder. You can read up more on the Filesystem component a href="http://symfony.com/doc/current/components/filesystem/introduction.html">here.
if ($this->filesystem->exists($path)) {
 throw new \Exception(“Error module already exists”);
}
Your class should now look like the following:
<?php
namespace PocketGuide\Generators\Model;
use \Symfony\Component\Filesystem\Filesystem;
class ModuleFolderGenerator
{
 /** @var Filesystem $filesystem */
 private $filesystem;
 public function __construct(Filesystem $filesystem)
 {
 $this->filesystem = $filesystem;
 }
 public function make($path)
 {
 $basePath = ‘app/code/’;
 if ($this->filesystem->exists($basePath . $path)) {
 throw new \Exception(“Error module already
exists”);
 }
 }
}
Again, we are not doing a great deal here. If the path already exists, we want an exception to be thrown. We will handle the creation of folders next. For now, let’s run PhpSpec again and see if we are back to green: phpspec run.
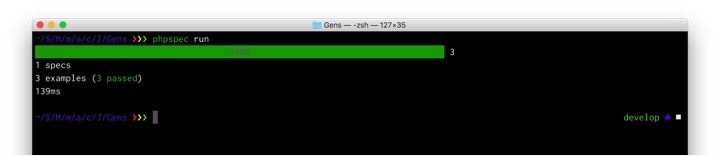
You should now have a passing scenario.
Adding more behaviour and creating folders
Let’s pull in a new assertion library called code>expect by adding the following to the require-dev section of composer.json.
“bossa/phpspec2-expect”: “*”,Important note: Don’t forget to run composer update to get the package.
Let’s add a new example to our spec file:
PocketGuide/Generators/spec/Model/ModuleFolderGeneratorSpec.php
function it_should_create_a_folder_given_a_valid_
path($filesystem)
{
 $path = ‘app/code/test/test’;
 $filesystem->exists($path)->willReturn(false);
 $filesystem->mkdir($path, 0700)->willReturn(true);
 $this->make($path)->shouldReturn(true);
}
Let’s break this down. We know we want to create a new folder given a valid path. So again we need to pass the mock filesystem. We then create a path variable. This will store the test path of the folder we want the application to create. We then need to check if the folder exists and set false as the folder will not exist. We then call the helper methodmkdir and set that this will return true. Finally we call the make method within our class and expect it to return as true.
Now when you run this test it will fail:
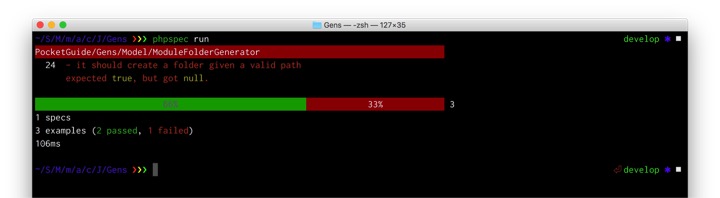
We expect the method to return true, but received null instead. This is because we have not updated our class to actually do something. Open up the class and add this to the make method:
public function make($path)
{
 ...
 return $this->filesystem->mkdir($basePath . $path, 0700);
}
Running PhpSpec again will show us a passing suite:
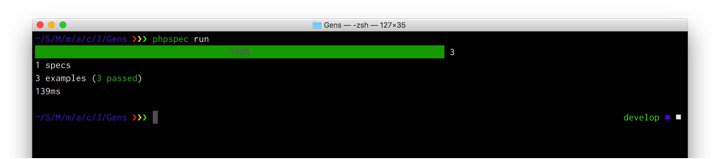
Now you have a basic class that will:
- Throw an exception if the module exists
- Create a folder given the path.
Injecting the models into the controller
Now we have a Model class that will generate folders in the correct location, we need to make this class available to the Command class. To do this we take advantage of dependency injection. This time, we can implement constructor injection so there is no need to add or update anything in the di.xml file.
Let’s open up the Command class we first created and add the class we want to inject into the constructor.
<?php
use PocketGuide\Generators\Model\Generator;
 /** @var Generator $generator */
 private $generator;
 /**
 * @param Generator $generator
 */
 public function __construct(Generator $generator)
 {
 $this->generator = $generator;
 parent::__construct();
 }
Now we have access to the generator model that we created. Next up we want to modify the execute method to use the make method and actually create directories for us.
protected function execute(InputInterface $input,
OutputInterface $output)
{
 ...
 $this->generator->make($input->getArgument(‘name’)));
 $output->writeln(“Module folder created”);
}
The completed ModuleFolderGenerator.php class should look like the following:
<?php
namespace PocketGuide\Generators\Model;
use \Symfony\Component\Filesystem\Filesystem;
class ModuleFolderGenerator
{
 /** @var \Symfony\Component\Filesystem\Filesystem
$filesystem */
 private $filesystem;
 /**
 * ModuleFolderGenerator constructor.
 * @param \Symfony\Component\Filesystem\Filesystem
$filesystem
 */
 public function __construct(Filesystem $filesystem)
 {
 $this->filesystem = $filesystem;
 }
 /**
 * @param $path
 * @throws \Exception
 */
public function make($path)
 {
 $basePath = ‘app/code/’;

 if ($this->filesystem->exists($basePath . $path)) {
 throw new \Exception(“Error module already
exists”);
 }
 return $this->filesystem->mkdir($basePath . $path,
0700);
 }
}
Congratulations! You have completed this tutorial on how to create a Magento 2 module using the Command Line. You have also seen how simple it is to use PHPSpec during the course of a modules development.
Conclusion
In this guide we’ve covered the basic structure of Magento 2 (now known as Magento Commerce/Magento Open Source) folders and the folders that make up a Magento 2 module. From there we explored one of the new features of Magento 2 (magento bin command) and how we can add new commands to this tool. Finally, we designed some code using PhpSpec and added a custom generator to the CLI script.
I hope you have found this tutorial useful (and do check-out the Github resources here)!