Magento Commerce tutorial: how to use the new frontend templating system
This guide looks specifically at the changes to Magento Commerce’s frontend templating system, with particular consideration for developers upgrading sites from Magento 1 to Magento Commerce.
On the whole, the changes aren’t too drastic, but it will take developers some time to become familiar with the new system – especially around the changes to layout XML and the overall project structure of Magento Commerce, as it’s quite unique compared to Magento 1.
Find more of our technical tutorials here.
About this series
This guide is brought to you by Inviqa, one of Europe's most acclaimed Magento Commerce Trained Solution Partners. We built two of the world’s very first Magento Commerce websites – Graze and Byredo.
Our guides are based on real-world experience with the platform to give an understanding of what it’s like to work with Magento Commerce from a frontend engineer, backend engineer, and admin user perspective. See all our technical tutorials here.
Please note, this guide was first published ahead of Magento Commerce general availability and therefore can be subject to amendments. This guide was written by Richard Thompson, a certified Magento frontend developer.
1. Project structure
One of the biggest differences between the two versions of Magento is the way the whole project is structured. Unlike Magento 1.x where templates were defined inapp/design/frontend/<package>/<your_theme> and your theme assets defined inskin/frontend/<package>/<your_theme>, in Magento Commerce everything is consolidated into one base folder location. In this case, there is no longer a separate skin folder for theme assets. All of your templates and assets are now stored in: app/design/frontend/<package>/<your_theme> (in other words, the old location for your templates).
You will soon see that, unlike Magento 1.x where all the templates were stored in app/design/frontend/<package>/theme>/template, there are a number of folders, as demonstrated in the screenshot below.
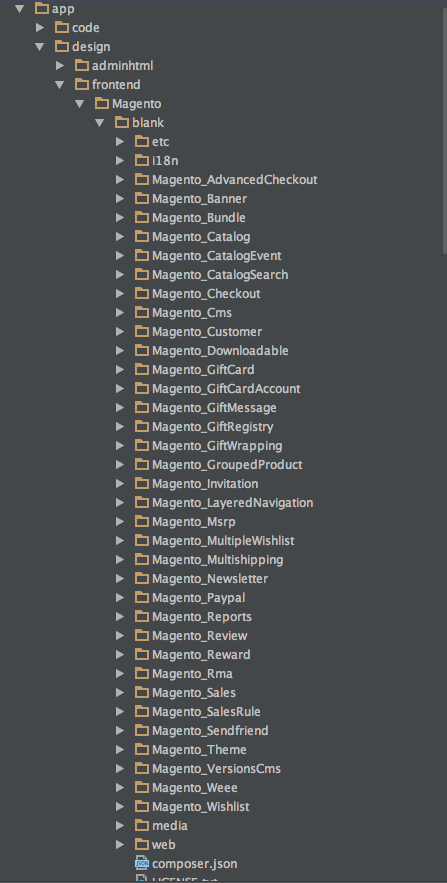
Each one of these folders represents a module in Magento Commerce where templates or assets are overridden in this theme. The location of the default versions of each module can be found in app/code/Magento
Let’s take a look at the structure of a typical module.
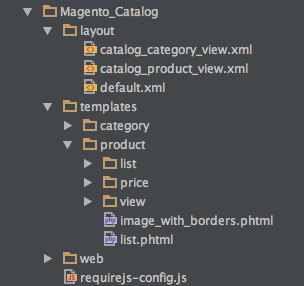
Here is an example of the checkout module in a custom theme. As you can see, it contains a folder for layout updates (more on that later) one for templates and a “web” folder, which replaces the old skin/frontend/<package>/<theme> folder. However, instead of having all your sitewide assets and JS in this folder, such items are now organised per module – in this case, the Magento Checkout module.
Those of you with a keen eye may also have noticed that there is a template folder in the web folder of this module. This is unique to a few Magento Commerce modules (including Checkout) where Magento Commerce employs KnockoutJS for templating. We’ll look at KnockoutJS in more detail in a later tutorial. These templates use .html files and internal logic (i.e. no PHP is involved).
As explained earlier, if you want to override / amend the core modules’ templates and JS, you will need to create an equivalent module folder in your theme that matches the path(s) of the file(s) you wish to override / extend.
Taking another example, if you take a look in app/code/Magento you will see all of the default modules used by Magento Commerce core. If you want to override something in the Catalog module, for example, you would then need to create a folder in your theme called Magento_Catalog. This references the <package_name>, in this case the “Magento” portion of app/code/Magento i.e. app/code/<package>, and then the portion after the underscore refers to the module name. In this case, this is Catalog: app/code/<package>/<module>
In other words, to override the contents of a module in appcode/<package>/<module>yapp/code/<package>/<module>, you will need to create a folder named <package>_<module> in your theme.
Also note that you can only override the contents of the view/frontend portion of the module within your theme (so app/code/Magento/Catalog/view/frontend maps to app/design/frontend/<your_package>/<your_theme>/Magento_Catalog). If you need to override Controllers and Blocks, this is done in a different location and normally by a backend developer, which is not covered in this guide.
2. Creating a theme
There are number of improvements to the way themes are managed and set up in Magento Commerce. The use of the theme.xml definition file, introduced in Magento 1.9, and a new fallback system, are two of the most significant improvements. The fallback system in Magento Commerce works in a similar way to Magento 1.x, but has the added advantage that you can select unlimited parent themes to inherit from / fallback to – all via the theme.xml file in your theme.
In Magento 1.9, which first introduced a similar type of theme.xml fallback, you could fallback to the Enterprise theme, for example, if you needed to. However, Magento Commerce allows you to have unlimited fallback levels and the method by which fallbacks work is much cleaner. So let’s take a look at creating a new theme.xml and a new theme!
Let’s say you want to create a brand new theme based on the new Magento “Blank” theme. First, you would create a new folder in app/design/frontend called, for example Session/default. You would then create a theme.xml file in this directory (it is probably best to copy it from app/design/frontend/Magento/blank/theme.xml), name your theme, and choose any parent. In this case, we want Magento Commerce’s Blank theme.
So your theme.xml file should look something like this:
<theme xmlns:xsi=”http://www.w3.org/2001/XMLSchema-instance”
xsi:noNamespaceSchemaLocation=”../../../../lib/internal/
Magento/Framework/Config/etc/theme.xsd”>
<title>Session Default</title>
<parent>Magento/blank</parent>
</theme>
Once you have created this file, you need to login to the admin section and visit the themes page. Head to content > themes on the left-hand navigation to find this section. Once on this page, you should see your new theme!
You now need to select your theme. To do this, head to stores > configuration. When on this page, click the design tab in the left-hand menu. You should then see a drop down on the right-hand side with the label “Design Theme”. From here, you can select your new theme, save the config, clear all your caches and your store will use your new theme. When you visit your store after this, it will look exactly the same as the Blank theme, as we haven’t made any amendments to the native theme yet.
3. Overriding templates
One of the most common things a frontend developer will do when working with Magento Commerce is to override a template. Once you know the location of the template you want to override, the same process applies to Magento Commerce as it does with Magento 1.x. Copy the file from the original location and place it in the correct place in your theme so that Magento uses that file over the original.
Here’s an example. Let’s say we want to override the description template and add a wrapper round the product description for example.
The original file for this can be found in the app/code/Magento directory, specifically in the Catalog module folder which is located here: app/code/Magento/Catalog/view/frontend/templates/product/view/description.phtml
If you remember from earlier, to override this we need to create a folder which matches the Package and Module name, as well as the module’s internal folder path to the file we wish to override in our own theme directory. So in this case, we copy the original description.phtml and place it into the following path: app/design/frontend/Session/default/Magento_Catalog/templates/product/view/description.phtml
We can then make our adjustments / amendments to this file, and after clearing all caches (if they are active), you should see your changes in your HTML source. As a general note, you must always copy the original file across to your own theme, as template files are always overridden and not extended as with layout XML files.
This basic rule of overriding templates applies throughout the whole of Magento Commerce. There are some exceptions, especially when it comes to the checkout process, but the basic logic behind even this is still similar.
4. Blocks and containers
One of the biggest changes to the way that templating and layout changes work in Magento Commerce vs Magento 1.x is the introduction of the container. This and other improvements to the layout system provides considerable added functionality.
In most instances using Magento 1.x, the templates for each layout (whether 1column or 2columns-left or different) were defined in the following files: app/design/frontend/base/default/template/page/template/container.phtml
These files contained the “base” for the whole page including the doctype / head / body and all of the childHtml() calls to load various other blocks such as the footer / header etc.
In Magento Commerce, this works very differently as the “structure” of the site itself is built using containers, which are defined instead in XML. A lot of readers may see this as a chore and think “not more XML!”. However, it really isn’t as bad as it sounds, and actually improves the ease of expanding and modifying / repositioning elements on the page.
Also, as a result of this change, you will find yourself using the childHtml() method a lot less to position your content and blocks within the template files as you would have done in Magento 1.x. This still works as it did in Magento 1.x as there are still some occasions where it is still applicable. However, using containers / blocks and the before / after attributes are sufficient in most cases to get the result you need.
A container is an XML attribute definition much like a <block> definition was in Magento 1.x. However, a container also has additional attributes such as htmlTag, which are then used to compile the template HTML when passed through to the Magento rendering engine. Let’s take a look at a quick example:
<container name=”checkout.cart.container” htmlTag=”div”
htmlId=”cart-container-id” htmlClass=”cart-container”
before=”-”>
</container>
This small piece of XML would generate the following HTML:
<div class=”cart-container” id=”cart-container-id”></div>So if you wanted to place a new template inside this wrapper, you could do the following:
<container name=”checkout.cart.container” htmlTag=”div”
htmlId=”cart-container-id” htmlClass=”cart-container”
before=”-”>
 <block class=”Magento\Framework\View\Element\Template”
name=”a.custom.block” template=”Magento_Checkout::yourtemplate.phtml”
before=”-” />
</container>
This would generate the following:
<div class=”cart-container” id=”cart-container-id”>
 I’m the contents of the your-template.phtml file.
</div>
The beauty of using this method to define the “structure” or “scaffolding” of your page is that you can easily move elements around, add a new HTML wrapper, and readjust where something is placed – all based on criteria purely in XML.
Consider if we had a sidebar on the right of the homepage, which we’d want to move to the left on a category page. In Magento 1.x, you would invariably have to create a different template for each of these layouts (there was also the ‘unset and redefine’ trick, but that was quite buggy and could get messy at times). In Magento Commerce, you can simply move containers and blocks around to any other block or container that is defined in the XML! We’ll go into more detail on this in the next section.
You can still define new layouts such as 1-column, 2-column etc. and this will be discussed in more detail in a future guide. However, they are used much less now due to the power of the new layout system (most changes can be done in a module’s XML files) and the introduction of containers to wrap your templates / blocks in.
Note: In Magento Commerce, layout files now extend files further down the fallback tree. You can simply create a new file of the same name, add in your adjustments, and everything will be compiled into one big XML file, including all the definitions in fallback themes.
5. Moving elements around
One of the best new features of the new templating and layout system in Magento Commerce is the ability to move blocks and containers to different locations within the page. Although this isn’t a guide on the new layout per se, as this will be discussed in more detail in a later guide, this is a feature which really affects how templating works.
To move a block from one container or block to another, you simply need to use the following syntax:
<move element=”name.of.container.or.block”
destination=”name.of.destination.block.or.container” />
If you move a container which has a number of blocks or containers nested inside it, these will be moved along with it and the parent / child hierarchy will remain intact.
Note: Although correct at the time of writing, the syntax for the move command is currently in review and may change in the future.
6. Creating your own templates
Creating your own blocks and templates is more or less the same as in Magento 1.x. As with Magento 1.x, you create a new template by defining a block.
<block class=”Magento\Framework\View\Element\Template”
name=”basket.breadcrumb” template=”Magento_Theme::yourtemplate.phtml”
before=”-” />
You will note the “class” associated with the block definition above. This is the class type you use when creating a standard block which doesn’t require any extra functionality and is designed just for hard coded content. If you need to link this to another block type, you just switch it here as with Magento 1.x. Note that the syntax is slightly different.
You will also note the syntax of the “template” attribute:
Magento_Checkout::breadcrumbs.htmlThis is the shorthand syntax for linking to the templates directory in a particular module (in this case Magento_Checkout). So, in this instance, it is calling the breadcrumbs. phtml file in the following location: app/design/frontend///Magento_Checkout/templates/breadcrumbs.phtml
If the layout XML file you are editing is already located in the same module as the template you are calling, you can skip the module definition and simply call the template as follows:
template=”your-template.phtml”This would link to the templates directory within the module where the layout XML is located. If you wish to place a block within another block or a container, you can either define this within the block or container parent definition (as was shown in the previous section) or you can use the “referenceBlock” or “referenceContainer” methods.
<referenceContainer name=”main.content”>
 <block class=”Magento\Framework\View\Element\Template”
name=”product-recommended-list”
template=”Magento_Catalog::product/list/product-recommendedlist.phtml”
/>
</referenceContainer>
7. Checkout (KnockoutJS)
One of main exceptions to the rule with templates in Magento Commerce is the checkout. As mentioned earlier, this doesn’t use the same method of defining blocks and templates as the rest of the site.
It is beyond the scope of this guide to discuss this at any length, but in general if you wish to override one of these files you can use the same logic as with overriding other templates. However, adding new templates and data is very different and will be discussed in a later guide.
Say you wanted to override the registration template, which is shown at the end of the checkout process. This file is originally located here: app/code/Magento/Checkout/view/frontend/web/template/registration.html
To override it, you would need to copy the original to the following location and make any amendments you wanted in the new file. app/design/frontend///Magento_Checkout/web/template/registration.html
Note: The file extension used for the checkout template files is .html not .phtml. We will publish another tutorial specifically on KnockoutJS at a later date. You can sign up here to be notified when this guide is available.
8. Conclusion
The new templating system is a big improvement over Magento 1.x in conjunction with the new layout functionality that is now available in Magento Commerce. The ability to move blocks and containers around is really a great feature that is now available. In terms of the whole project structure, this is also an improvement over the original Magento. Having templates and assets separated by module makes things much easier to find and modify and is a lot more logical than the Magento 1.x implementation.